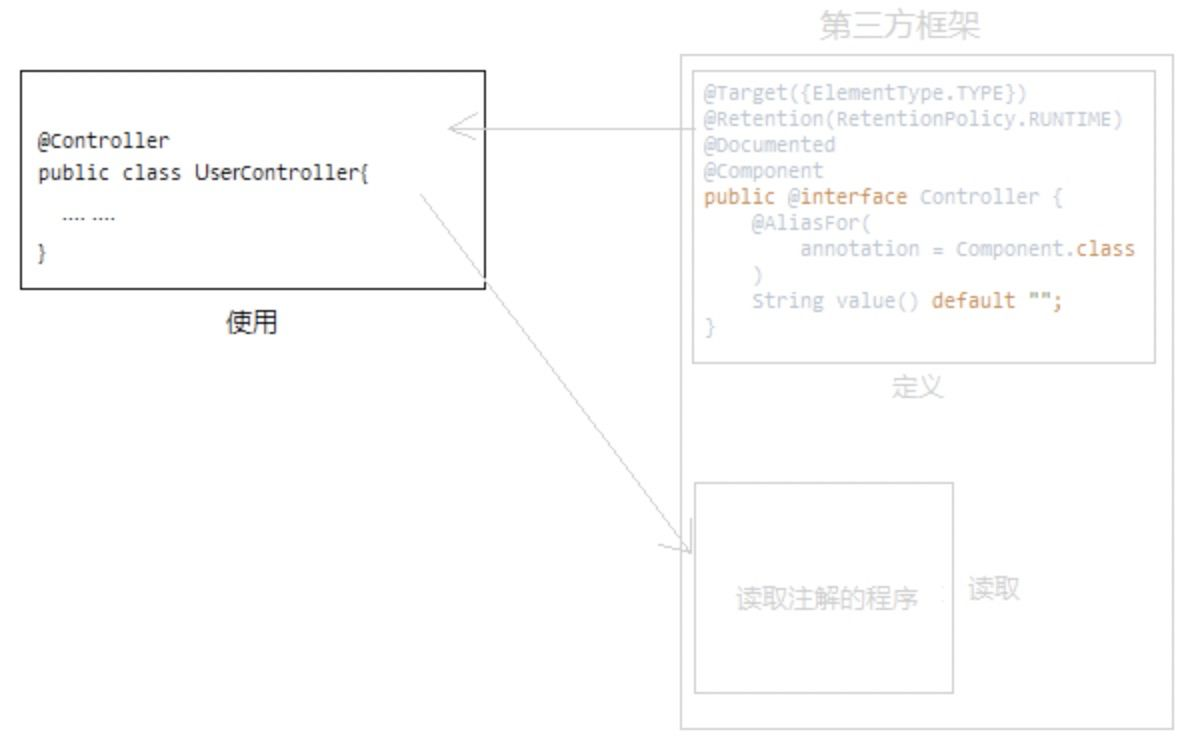
泛型机制
Java 泛型详解
1 泛型概述
父类构建泛化流程,子类重写特化方法
泛型构建泛化流程,实例重写特化方法
在那个大量使用泛型的类中,包含多个 泛型函数式接口,在实例化的时候,提供泛型类型和函数式接口的实现(本质上也是通过子类重写特化的方法)
- 泛型提供编译时类型检查,使代码更加健壮。
- 菱形语法允许在声明的时候指定类型,在定义的时候自动推断类型
- 定义泛型,定义变量、创建对象、调用方法时动态指定类型参数,动态生成无数多个逻辑上的子类,但是这种子类在物理上斌不存在。数据形参和数据数据实参,泛型形参和泛型实参。
- 在使用时,不同的泛型实参表示不同的类类型,泛型实参之间不支持继承关系,即泛型实参是子类型不能赋值给泛型形参是父类型的参数。但是不同泛型实参的对象使用getClass得到的结果是同一个类型。
- 泛型与继承,泛型类的继承和实例化都必须指定泛型实参。如果不关注泛型实参类型,可以使用类型通配符?,并且可以指定类型通配符的上界和下界。
基本概念
Java 泛型(generics)是 JDK 5 中引入的一个新特性, 泛型提供了编译时类型安全检测机制,该机制允许程序员在编译时检测到非法的类型。
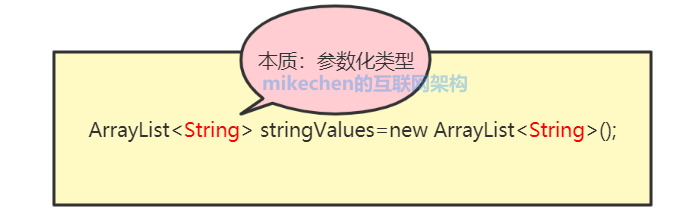
泛型的本质是参数化类型,即给类型指定一个参数,然后在使用时再指定此参数具体的值,那样这个类型就可以在使用时决定了。这种参数类型可以用在类、接口和方法中,分别被称为泛型类、泛型接口、泛型方法。
与 C#中的泛型相比,Java 的泛型可以算是“伪泛型”了。在 C#中,不论是在程序源码中、在编译后的中间语言,还是在运行期泛型都是真实存在的。Java 则不同,Java 的泛型只在源代码存在,只供编辑器检查使用,编译后的字节码文件已擦除了泛型类型,同时在必要的地方插入了强制转型的代码。
泛型的第一作用:起到约束和规范的作用,约束类型属于某一个,规范使用只能用某一种类型。可以让我们业务变得更加清晰和明了并得到了编译时期的语法检查。
泛型的第二作用:使用泛型的类型或者返回值的方法,自动进行数据类型转换。
泛型类、泛型方法、泛型接口提供的功能与泛型的类型无关。泛型至于输入输出的类型有关。
泛型的基本用法
1
2
3
4
5
6
| public class Box<T> {
private T t;
public void set(T t) { this.t = t; }
public T get() { return t; }
}
|
2 优势
- 安全性?
- 消除转换?
- 提升性能?
- 重用行。不同类型不需要重载。泛型本质上也是一种编译时多态。
安全性
在没有泛型之前,从集合中读取到的每一个对象都必须进行类型转换,如果不小心插入了错误的类型对象,在运行时的转换处理就会出错。
1
2
3
4
5
| public static void noGeneric() {
ArrayList names = new ArrayList();
names.add("mikechen的互联网架构");
names.add(123);
}
|
1
2
3
4
5
| public static void useGeneric() {
ArrayList<String> names = new ArrayList<>();
names.add("mikechen的互联网架构");
names.add(123);
}
|
相当于告诉编译器每个集合接收的对象类型是什么,编译器在编译期就会做类型检查,告知是否插入了错误类型的对象,使得程序更加安全,增强了程序的健壮性。
消除强制转换
泛型的一个附带好处是,消除源代码中的许多强制类型转换,这使得代码更加可读,并且减少了出错机会。
1
2
3
| List list = new ArrayList();
list.add("hello");
String s = (String) list.get(0);
|
1
2
3
| List<String> list = new ArrayList<String>();
list.add("hello");
String s = list.get(0);
|
避免了不必要的装箱、拆箱操作,提高程序的性能
在非泛型编程中,将简单类型作为 Object 传递时会引起 Boxing(装箱)和 Unboxing(拆箱)操作,这两个过程都是具有很大开销的。引入泛型后,就不必进行 Boxing 和 Unboxing 操作了,所以运行效率相对较高,特别在对集合操作非常频繁的系统中,这个特点带来的性能提升更加明显。
- 泛型变量固定了类型,使用的时候就已经知道是值类型还是引用类型,避免了不必要的装箱、拆箱操作。
1
2
3
| object a=1;
int b=(int)a;
|
1
2
3
4
5
6
7
8
9
10
11
| public static T GetValue<T>(T a)
{
return a;
}
public static void Main()
{
int b=GetValue<int>(1);
}
|
提高了代码的重用行
- 显而易见,能够通过泛型代替部分重载,大大提升了可用性。
3 泛型的使用
都是通过尖括号定义的
泛型类
- 定义泛型类,在类名后添加一对尖括号,并在尖括号中填写类型参数,参数可以有多个,多个参数使用逗号分隔:
1
2
| public class 类名 <泛型类型1,...> {}
public class GenericClass<ab,a,c> {}
|
1
2
3
4
5
6
7
8
9
10
11
12
13
14
| public class GenericClass<T> {
private T value;
public GenericClass(T value) {
this.value = value;
}
public T getValue() {
return value;
}
public void setValue(T value) {
this.value = value;
}
}
|
例如,ArrayList<String> list = new ArrayList<String>();
此时,变量 E 的值就是 String 类型,那么我们的类型就可以理解为:
1
2
3
4
5
6
| class ArrayList<String>{
public boolean add(String e){ }
public String get(int index){ }
...
}
|
举例自定义泛型类
1
2
3
4
5
6
7
8
9
10
11
12
| public class MyGenericClass<MVP> {
private MVP mvp;
public void setMVP(MVP mvp) {
this.mvp = mvp;
}
public MVP getMVP() {
return mvp;
}
}
|
使用:
1
2
3
4
5
6
7
8
9
10
11
12
13
14
15
| public class GenericClassDemo {
public static void main(String[] args) {
MyGenericClass<String> my = new MyGenericClass<String>();
my.setMVP("大胡子哈登");
String mvp = my.getMVP();
System.out.println(mvp);
MyGenericClass<Integer> my2 = new MyGenericClass<Integer>();
my2.setMVP(123);
Integer mvp2 = my2.getMVP();
}
}
|
泛型接口
定义格式:
1
| 修饰符 interface接口名<代表泛型的变量> { }
|
例如,
1
2
3
4
5
| public interface MyGenericInterface<E>{
public abstract void add(E e);
public abstract E getE();
}
|
使用格式:
1、定义类时确定泛型的类型
例如
1
2
3
4
5
6
7
8
9
10
11
| public class MyImp1 implements MyGenericInterface<String> {
@Override
public void add(String e) {
}
@Override
public String getE() {
return null;
}
}
|
此时,泛型 E 的值就是 String 类型。
2、始终不确定泛型的类型,直到创建对象时,确定泛型的类型
例如
1
2
3
4
5
6
7
8
9
10
11
| public class MyImp2<E> implements MyGenericInterface<E> {
@Override
public void add(E e) {
}
@Override
public E getE() {
return null;
}
}
|
确定泛型:
1
2
3
4
5
6
7
8
9
|
public class GenericInterface {
public static void main(String[] args) {
MyImp2<String> my = new MyImp2<String>();
my.add("aa");
}
}
|
泛型方法
1
2
3
4
5
6
7
8
9
10
11
12
13
14
15
16
17
18
| 修饰符 <代表泛型的变量> 返回值类型 方法名(参数){ }
public <T> T genercMethod(T t){
System.out.println(t.getClass());
System.out.println(t);
return t;
}
|
1
2
3
4
5
6
7
8
9
10
| public class GenericMethodDemo {
public static void main(String[] args) {
MyGenericMethod mm = new MyGenericMethod();
mm.show("aaa");
mm.show(123);
mm.show(12.45);
}
}
|
4 泛型通配符
Java 泛型的通配符是用于解决泛型之间引用传递问题的特殊语法。泛型与继承之间的关系
? extends T:上界(协变,用于“读”)? super T:下界(逆变,用于“写”)
- 无边界通配符<?>
- 无边界的通配符的主要作用就是让泛型能够接受未知类型的数据.
- 固定上边界的通配符<? extends E>
- 使用固定上边界的通配符的泛型, 就能够接受指定类及其子类类型的数据。
- 要声明使用该类通配符, 采用<? extends E>的形式, 这里的 E 就是该泛型的上边界。
- 注意: 这里虽然用的是 extends 关键字, 却不仅限于继承了父类 E 的子类, 也可以代指显现了接口 E 的类
- 固定下边界的通配符<? super E>
- 使用固定下边界的通配符的泛型, 就能够接受指定类及其父类类型的数据.。
- 要声明使用该类通配符, 采用<? super E>的形式, 这里的 E 就是该泛型的下边界.。
- 注意: 你可以为一个泛型指定上边界或下边界, 但是不能同时指定上下边界。
1
2
3
4
5
6
7
8
|
public class Apple<?>{}
public class Apple<T extends A>{}
public class Apple<T supers A>{}
|
口诀:PECS
Producer-Extends(生产者用 extends)
Consumer-Super(消费者用 super)
例:读多写少
1
2
3
4
5
| static double sum(List<? extends Number> nums) {
double s = 0;
for (Number n : nums) s += n.doubleValue();
return s;
}
|
List<Integer>、List<Double> 都能传进来。
例:写入 T
1
2
3
4
| static void addInts(List<? super Integer> dst) {
dst.add(1);
dst.add(2);
}
|
List<Number>、List<Object> 都能接收 Integer。
5 泛型中的 KTVE
泛型中的规范
- T:任意类型 type
- E:集合中元素的类型 element
- K:key-value 形式 key
- V: key-value 形式 value
- N: Number(数值类型)
- ?: 表示不确定的 java 类型
6 泛型的实现原理
泛型本质是将数据类型参数化,它通过擦除的方式来实现,即编译器会在编译期间「擦除」泛型语法并相应的做出一些类型转换动作。
实际上编译器会正常的将使用泛型的地方编译并进行类型擦除,然后返回实例。但是除此之外的是,如果构建泛型实例时使用了泛型语法,那么编译器将标记该实例并关注该实例后续所有方法的调用,每次调用前都进行安全检查,非指定类型的方法都不能调用成功。
实际上编译器不仅关注一个泛型方法的调用,它还会为某些返回值为限定的泛型类型的方法进行强制类型转换,由于类型擦除,返回值为泛型类型的方法都会擦除成 Object 类型,当这些方法被调用后,编译器会额外插入一行 checkcast 指令用于强制类型转换,这一个过程就叫做『泛型翻译』。
7 泛型与反射
反射
1
2
3
4
5
6
7
8
9
10
11
12
13
14
15
16
17
18
19
20
21
22
| getClass().getGenericSuperclass()).getActualTypeArguments()[0].newInstance();
public void init(){
try {
Type[] typeArguments = ((ParameterizedType) getClass().getGenericSuperclass()).getActualTypeArguments();
for(Type type : typeArguments){
System.out.println("type:"+type);
}
Class<T> tClass = (Class<T>) typeArguments[0];
Class<D> dClass = (Class<D>) typeArguments[1];
Class<E> cClass = (Class<E>) typeArguments[2];
this.t = tClass.newInstance();
this.d = dClass.newInstance();
this.e = cClass.newInstance();
} catch ( Exception e) {
e.printStackTrace();
}
}
|
1
2
3
4
5
6
7
8
9
10
11
12
13
14
15
16
| getConstructor().newInstance()
public void init(){
try {
Type[] typeArguments = ((ParameterizedType) getClass().getGenericSuperclass()).getActualTypeArguments();
for(Type type : typeArguments){
System.out.println("type:"+type);
}
T e = (T) ((Class)typeArguments[0]).getConstructor().newInstance();
D e = (D) ((Class)typeArguments[1]).getConstructor().newInstance();
E e = (E) ((Class)typeArguments[2]).getConstructor().newInstance();
} catch ( Exception e) {
e.printStackTrace();
}
}
|
1
2
3
4
5
6
7
8
9
10
11
12
13
14
15
16
17
| Class.forName(className).newInstance()
public void init(){
try {
Type[] typeArguments = ((ParameterizedType) getClass().getGenericSuperclass()).getActualTypeArguments();
for(Type type : typeArguments){
System.out.println("type:"+type);
}
T t = (T) Class.forName(typeArguments[0].getTypeName()).newInstance();
D d = (D) Class.forName(typeArguments[1].getTypeName()).newInstance();
E e = (E) Class.forName(typeArguments[2].getTypeName()).newInstance();
} catch ( Exception e) {
e.printStackTrace();
}
}
|
8 泛型最佳实践
继承体系里怎么用泛型:三种典型结构
8.1 父类泛型化(模板基类)
让子类指定具体类型:
1
2
3
4
5
6
7
8
9
| abstract class Repository<ID, E> {
abstract E findById(ID id);
abstract void save(E e);
}
class UserRepo extends Repository<Long, User> {
@Override User findById(Long id) { ... }
@Override void save(User u) { ... }
}
|
适合:DAO、Client、Handler 这类“同一个模式,不同实体类型”。
8.2 子类保留泛型(继续向下传递)
1
2
3
4
5
| class Box<T> { T value; }
class TimedBox<T> extends Box<T> {
long time;
}
|
适合:装饰/增强、公共能力复用(缓存、计时、审计)。
8.3 父类想“知道子类类型”:CRTP(自引用泛型)
用于流式 API / Builder / DSL,解决“父类方法返回子类类型”的问题:
1
2
3
4
5
6
7
8
| abstract class BaseBuilder<B extends BaseBuilder<B>> {
protected abstract B self();
public B withName(String name) { return self(); }
}
class UserBuilder extends BaseBuilder<UserBuilder> {
@Override protected UserBuilder self() { return this; }
}
|
调用方能得到正确链式类型:new UserBuilder().withName("a")...
9 复杂问题
复杂问题 1 类型安全地组合“处理器/策略/管道”
目标:一套管道把 I -> O 转换串起来,同时支持继承、多态组合。
定义泛型接口
1
2
3
| interface Handler<I, O> {
O handle(I input);
}
|
组合(关键:通配符)
组合函数:把 Handler<A,B> 和 Handler<B,C> 组合成 Handler<A,C>。
1
2
3
4
5
| static <A, B, C> Handler<A, C> compose(
Handler<? super A, ? extends B> h1,
Handler<? super B, ? extends C> h2) {
return a -> h2.handle(h1.handle(a));
}
|
为什么这么写?
- h1 能接收 A 的父类(
? super A)
- h1 的输出是 B 的子类(
? extends B)
- h2 同理
这让组合对继承层次更“宽容”。
复杂问题 2:泛型 + 继承做“注册表/工厂/插件”
目标:根据类型拿到对应实现,例如 Service 按请求类型分发。
Key 用 Class<T>(类型令牌)
1
2
3
4
5
6
7
8
9
10
11
12
13
14
15
16
| interface Processor<T> {
void process(T input);
}
class Registry {
private final Map<Class<?>, Processor<?>> map = new HashMap<>();
public <T> void register(Class<T> type, Processor<? super T> p) {
map.put(type, p);
}
@SuppressWarnings("unchecked")
public <T> Processor<T> get(Class<T> type) {
return (Processor<T>) map.get(type);
}
}
|
要点:
register 用 Processor<? super T>:允许用更通用的处理器注册(比如处理 Number 的处理器也能处理 Integer)。get 由于类型擦除,需要一次受控的强转;对外 API 仍然是类型安全的。
复杂问题 3:泛型集合 API 设计(复制、merge、填充)
复制:经典 copy
1
2
3
| static <T> void copy(List<? super T> dst, List<? extends T> src) {
for (T t : src) dst.add(t);
}
|
- src 生产 T:
extends
- dst 消费 T:
super
merge:K/V 继承关系更复杂
1
2
3
4
5
6
| static <K, V> void putAll(Map<? super K, ? super V> dst,
Map<? extends K, ? extends V> src) {
for (var e : src.entrySet()) {
dst.put(e.getKey(), e.getValue());
}
}
|
复杂问题 4:构建泛型数据库框架
1
2
3
4
5
6
7
8
9
10
11
12
13
14
15
16
17
18
19
20
21
22
23
24
25
26
27
28
29
30
31
32
33
34
35
36
37
38
39
40
41
42
43
44
45
46
47
48
49
50
51
52
53
54
55
56
57
58
59
60
61
62
63
64
65
66
67
68
69
70
71
72
73
74
75
76
77
78
79
80
81
82
83
84
85
86
|
public abstract class BaseEntity {
private Long id;
public Long getId() {
return id;
}
public void setId(Long id) {
this.id = id;
}
}
public interface IRepository<T extends BaseEntity> {
void save(T entity);
T findById(Long id);
List<T> findAll();
void update(T entity);
void delete(Long id);
}
public abstract class AbstractRepository<T extends BaseEntity>
implements IRepository<T> {
protected Map<Long, T> database = new HashMap<>();
protected Long idCounter = 0L;
@Override
public void save(T entity) {
entity.setId(++idCounter);
database.put(entity.getId(), entity);
}
@Override
public T findById(Long id) {
return database.get(id);
}
@Override
public List<T> findAll() {
return new ArrayList<>(database.values());
}
@Override
public void update(T entity) {
database.put(entity.getId(), entity);
}
@Override
public void delete(Long id) {
database.remove(id);
}
}
public class UserRepository extends AbstractRepository<User> {
public List<User> findByName(String name) {
return findAll().stream()
.filter(user -> user.getName().equals(name))
.collect(Collectors.toList());
}
}
public class User extends BaseEntity {
private String name;
private String email;
public User(String name, String email) {
this.name = name;
this.email = email;
}
public String getName() { return name; }
public void setName(String name) { this.name = name; }
public String getEmail() { return email; }
public void setEmail(String email) { this.email = email; }
}
UserRepository userRepo = new UserRepository();
User user = new User("张三", "zhangsan@example.com");
userRepo.save(user);
System.out.println(userRepo.findById(1L).getName());
|
复杂问题 5:构建泛型缓存框架
1
2
3
4
5
6
7
8
9
10
11
12
13
14
15
16
17
18
19
20
21
22
23
24
25
26
27
28
29
30
31
32
33
34
35
36
37
38
39
40
41
42
43
44
45
46
47
48
49
50
51
52
53
54
55
56
57
58
59
60
61
62
63
64
65
66
67
68
69
70
71
72
73
|
public interface CacheStrategy<K, V> {
void put(K key, V value);
V get(K key);
void remove(K key);
void clear();
}
public class LRUCache<K, V> implements CacheStrategy<K, V> {
private final int capacity;
private final LinkedHashMap<K, V> cache;
public LRUCache(int capacity) {
this.capacity = capacity;
this.cache = new LinkedHashMap<K, V>(capacity, 0.75f, true) {
@Override
protected boolean removeEldestEntry(Map.Entry eldest) {
return size() > capacity;
}
};
}
@Override
public void put(K key, V value) {
cache.put(key, value);
}
@Override
public V get(K key) {
return cache.get(key);
}
@Override
public void remove(K key) {
cache.remove(key);
}
@Override
public void clear() {
cache.clear();
}
}
public class CacheManager<K, V> {
private CacheStrategy<K, V> strategy;
public CacheManager(CacheStrategy<K, V> strategy) {
this.strategy = strategy;
}
public void set(K key, V value) {
strategy.put(key, value);
}
public V get(K key) {
V value = strategy.get(key);
if (value == null) {
System.out.println("从数据库加载: " + key);
}
return value;
}
}
CacheManager<String, User> userCache =
new CacheManager<>(new LRUCache<>(100));
User user = new User("张三", "zhangsan@example.com");
userCache.set("user:1", user);
User cached = userCache.get("user:1");
|
复杂问题 6:构建泛型事件系统
1
2
3
4
5
6
7
8
9
10
11
12
13
14
15
16
17
18
19
20
21
22
23
24
25
26
27
28
29
30
31
32
33
34
35
36
37
38
39
40
41
42
43
44
45
46
47
48
49
50
51
52
53
54
55
56
57
58
59
60
61
62
63
64
65
|
public abstract class Event {
private long timestamp;
public Event() {
this.timestamp = System.currentTimeMillis();
}
public long getTimestamp() {
return timestamp;
}
}
public class UserCreatedEvent extends Event {
private User user;
public UserCreatedEvent(User user) {
this.user = user;
}
public User getUser() {
return user;
}
}
public interface EventListener<T extends Event> {
void onEvent(T event);
}
public class EventPublisher {
private Map<Class<?>, List<EventListener<?>>> listeners =
new HashMap<>();
@SuppressWarnings("unchecked")
public <T extends Event> void subscribe(Class<T> eventType,
EventListener<T> listener) {
listeners.computeIfAbsent(eventType, k -> new ArrayList<>())
.add(listener);
}
@SuppressWarnings("unchecked")
public <T extends Event> void publish(T event) {
List<EventListener<?>> eventListeners =
listeners.get(event.getClass());
if (eventListeners != null) {
for (EventListener<?> listener : eventListeners) {
((EventListener<T>) listener).onEvent(event);
}
}
}
}
EventPublisher publisher = new EventPublisher();
publisher.subscribe(UserCreatedEvent.class, event -> {
System.out.println("用户创建事件: " + event.getUser().getName());
});
User user = new User("李四", "lisi@example.com");
publisher.publish(new UserCreatedEvent(user));
|
复杂问题 7:根据请求值类型定位返回值类型
“请求-响应对”+“策略分发”
1
2
3
4
5
6
7
8
9
10
11
12
13
14
15
16
17
18
19
20
21
22
23
24
25
26
27
28
29
30
31
32
33
34
35
36
37
38
39
40
41
42
43
44
45
46
47
48
49
50
51
|
public interface Request<R extends Response> {}
public interface Response {}
public class CreateUserReq implements Request<CreateUserRsp> {
private String name;
}
public class CreateUserRsp implements Response {
private Long id;
}
public interface Handler<Rq extends Request<Rs>, Rs extends Response> {
Rs handle(Rq request);
}
public class CreateUserHandler implements Handler<CreateUserReq, CreateUserRsp> {
@Override
public CreateUserRsp handle(CreateUserReq req) {
return new CreateUserRsp(1L);
}
}
public class Dispatcher {
private final Map<Class<?>, Handler<?, ?>> map = new ConcurrentHashMap<>();
public <Rq extends Request<Rs>, Rs extends Response>
void register(Class<Rq> reqType, Handler<Rq, Rs> handler) {
map.put(reqType, handler);
}
@SuppressWarnings("unchecked")
public <Rs extends Response> Rs execute(Request<Rs> request) {
Handler<?, ?> h = map.get(request.getClass());
if (h == null) throw new IllegalArgumentException("no handler");
return ((Handler<Request<Rs>, Rs>) h).handle(request);
}
}
Dispatcher dispatcher = new Dispatcher();
dispatcher.register(CreateUserReq.class, new CreateUserHandler());
CreateUserRsp rsp = dispatcher.execute(new CreateUserReq("tom"));
System.out.println(rsp.getId());
|
9 常见坑与建议
不要在外部 API 滥用 T extends Object
没意义,默认就是 Object 上界。
避免返回 List<?> 这种“无法用”的类型
返回 List<T> 或 List<? extends Base> 更实用。
数组与泛型不兼容
new T[] 不允许;用 List<T> 或传 IntFunction<T[]> / Class<T> 创建。
Optional<? extends T> 通常没必要
多用 Optional<T>;在参数处才常用通配符。
Comparable 的正确写法
1
| class A implements Comparable<A> { ... }
|
如果写工具方法:
1
| static <T extends Comparable<? super T>> T max(List<? extends T> list) { ... }
|