
01 2IOC基于XML容器管理
IOCBean管理基于XML方式
1 基于XMl方式创建对象
1 | <bean id="user" class="com.ykl.User"></bean> |
- 在Spring给你配置文件中,使用bean标签,标签里添加对应属性。实现对象的创建
- bean中有很多属性
- 创建对象的时候,执行无参构造函数。
2 基于XML方式注入属性
DI依赖注入,就是注入属性。
原始的属性注入方法
1 | /** |
第一种方法:使用set方法进行注入.
- 创建属性和属性对应的set方法。
- 在Spring配置文件配置对象创建和属性注入。
- 加载配置文件获取指定的对象。
1 |
|
1 |
|
第二种方法:使用有参构造函数进行注入
- 创建类和属性,创建对应属性的有参构造方法。
1 | /** |
- 通过有参构造方法创建对象进行依赖注入
1 | <bean id="order" class="com.ykl.Order"> |
- p名称空间注入方法
- 用于简化xml的配置方法。在beans里添加p命名空间
- 在bean标签里添加键值对。
1 | <beans xmlns:p="http://www.springframework.org/schema/p"> |
xml注入其他类型的属性
- 字面值,空值null
1 | <property name="address"> |
- 字面值,包含特殊符号
- 把特殊符号进行转义
1 | <property name="address" value="<<南京>>"> |
- 把特殊符号写到CDATA中
1 | <property name="address"> |
- 级联Bean——外部bean注入
- 创建service和dao类
- 在配置文件中配置注入操作
- 测试类,测试是否注入成功
1 |
|
1 |
|
1 | public class Test02 { |
- 级联Bean——内部bean
- 一对多关系:部门和员工。
- 在实体类之间表示一对多的关系。
1 | <bean id="emp" class="com.ykl.bean.Emp"> |
数据库3BNF范式的要求:
一对多的关系,需要在多的一方添加外键,指向一。
多对多的关系,需要拆分出关系类。任意一方和关系类都是一对多的关系。
- 级联赋值
- 外部bean注入
- 给外部bean的属性赋值
1 | <bean id="emp" class="com.ykl.bean.Emp"> |
xml注入集合属性
- 注入数组类型属性、List集合类型属性、Map集合类型属性
- 创建集合类型的属性。
- 注入集合类型的属性
1 | /** |
1 | <bean id="student" class="com.ykl.collectiontype.Student"> |
- XML注入集合中对象类型
1 | <bean> |
- 使用新的命名空间进行注入
- 在spring配置文件中引入util命名空间
- 提取list集合类型的属性注入。
1 |
|
3 普通bean和工厂bean
Spring中有两种类型的bean:
- 普通bean:在配置文件中定义的Bean类型就是返回类型
- 工厂bean:在配置文件中定义的Bean类型和返回类型可以不一样。
工厂bean的实现方法
- 创建类,让这个类作为工厂bean。实现接口factoryBean
- 实现接口里面的方法,在实现的方法中定义返回bean类型。
1 |
|
1 | <bean id="mybean" class="com.ykl.factorybean.MyBean"></bean> |
4 Bean的作用域
在Spring里可以设置Bean是单实例还是多实例。
在Spring里,默认情况下是,bean是单实例对象。
在spring文件bean标签里面的属性scope用于设置是单实例还是多实例。
- scope=singleton,表示单实例对象。
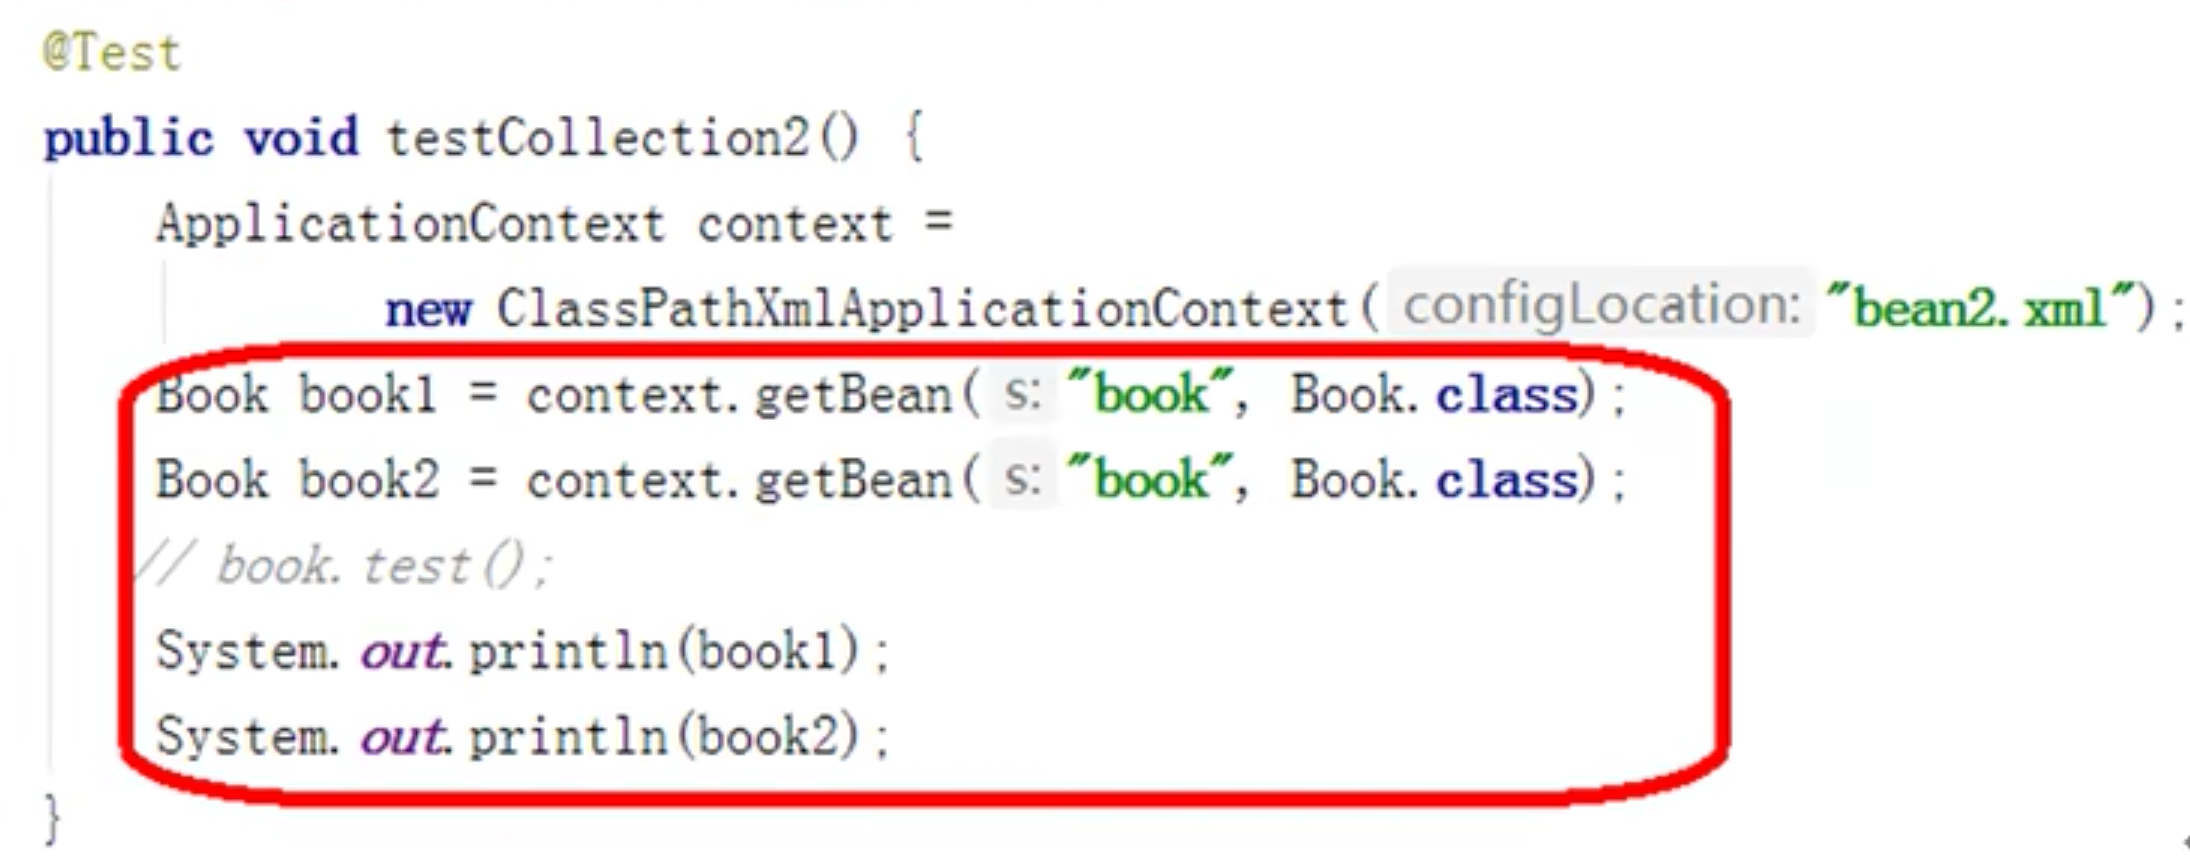
- scope=prototype,表示多实例对象。
1 | <bean id="book" class="com.ykl.collectiontype.Book" scope="prototype"> |
- singleton在加载配置文件的时候,就会创建单实例对象。饿汉式。
- prototype在调用getBean方法的时候,才会创建对象。懒汉式。
这个跟之前记录的BeanFactory和ApplicationContext的区别有点像。不如就说BeanFactory默认scope为prototype,ApplicationContext默认scope为singleton。
- scope还有一下两个值。表示不同的作用域。
- request
- seesion
5 Bean的生命周期
基本步骤
从对象创建到对象销毁的过程。包括五个最基本的步骤。
- 通过构造器创建bean实例。
- 为bean的属性设置值和对其他bean的引用(调用set方法)
- 调用bean中初始化的方法(需要进行配置)
- bean可以使用了
- 当容器关闭的时候,调用bean的销毁方法(需要进行配置)
1 | public class Order { |
1 | <bean id="order" class="com.ykl.bean.Order" scope="singleton" init-method="initMethod" destroy-method="destroyMethod"> |
Post处理器步骤
添加后置处理器后,总共有7步
- 通过构造器创建bean实例。
- 为bean的属性设置值和对其他bean的引用(调用set方法)
- 把bean实例传递bean后置处理器的方法
- 调用bean中初始化的方法(需要进行配置)
- 把bean实例传递Bean后置处理器的方法
- bean可以使用了
- 当容器关闭的时候,调用bean的销毁方法(需要进行配置)
实例:后置处理器的效果演示
创建类,实现接口BeanPostProcessor,创建后置处理器
1 | public class MyBeanPost implements BeanPostProcessor { |
1 | <bean id="order" class="com.ykl.bean.Order" scope="singleton" init-method="initMethod" destroy-method="destroyMethod"> |
6 自动装配
- 手动装配:通过property的那么和value属性。
- 自动装配:根据指定装配规则(属性名称或者属性类型),Spring自动将匹配的属性值进行注入。
- bean标签autowire实现自动装配。autowire通常包含连个值
- byName根据属性名称注入(bean的id和属性名称一致)
- byType根据属性类型注入(如果该类型有多个实例会出错)
1 | <bean id="emp" class="com.ykl.autowire.Emp" autowire="byName"></bean> |
7 外部属性文件
直接配置数据信息
1 | <bean id="dataSource" class="com.alibaba.druid.pool.DruidDataSource"> |
引入外部属性文件配置数据库连接池
- 编辑外部属性文件.properties
- 引入外部属性文件,添加新的命名空间context
1 | prop.driverClass=com.mysql.jdbc.Driver |
1 |
|
本博客所有文章除特别声明外,均采用 CC BY-NC-SA 4.0 许可协议。转载请注明来源 Estom的博客!
相关推荐
2021-03-09
Scrapy框架学习——琐碎知识整理
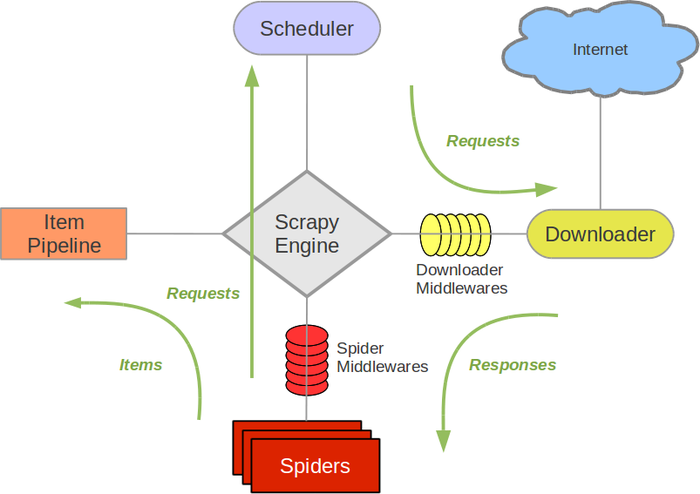
scrapy引擎 调度器 Spiders 下载器 Item Pipeline itemloader用来装载,item用来容纳,itempipeline用来过滤。也负责了指明了存好数据的item的数据流动的方向。itemloader是活动在原始数据和item之间的桥梁。itempipeline是活动在item和具体存储数据的位置之间的桥梁。比如用来操纵数据库、用来写入文件,用来提供下一次爬虫的相关信息。 下载器中间件 由调度器具体指挥,能够根据引擎发送的request对象,封装真正的request请求,并且设置请求的响应参数。不同的下载器中间件,能够完成不同的任务。 Spider中间件 引擎和Spider之间的钩子。用来处理Spider发送给引擎的request和Item和引擎发送给Spider的response。有点像网络的分层,没一层都向发送数据中添加一点内容,每一层都从接受数据中获得一点内容。有很多中间件,可以在这里过滤掉一些错误。另外,如果错误能够越提前的发现,则越有利于提高效率。 扩展Extension和信号signal 框架提供了一个很好的扩展机制。在配置文件中声明,...

2021-03-08
4. 静态建模
静态建模 描述了被建模系统的静态结构,不随时间变化而变化。 问题域静态建模:分析阶段对系统的主要概念进行建模。 目录 类间关系 约束 UML表示 系统上下文的静态建模 外部类静态建模 实体类的静态建模 1 类间关系1.1 关联关系 定义了两个类之间静态的、结构化的关系。 关联称为链接。类之间有链接关系的对象之间才会有链接。关联的方向取决于动作的方向。 自反关联(一元关联):一个类的一个对象和这个类的另一个对象之间的关联。 三元关联:三个类间的关联(两个类之间的关联关系也转化为一个类) 关联类:对两个或多个类之间的关系进行建模的类。 关联的多重性:一对一关联、一对多关联、规定数值的关联、可选关联(0…1表示可能存在)、多对多关联。 1.2 整体和部分的关系(组合聚合关系) 关系强弱:组合>聚合>关联 组合涉及整体和部分之间的物理关系。 聚合概念上的整体和部分关系,可以分开可以合并。 1.3 泛化特化关系 相同属性抽象为泛化类 不同属性表示了特化的性质 2 约束对关联、对象属性进行约束。 3 问题域静态建模——上下文类 通过分析用例模型来对问题域建模...
2020-09-10
11 原型链
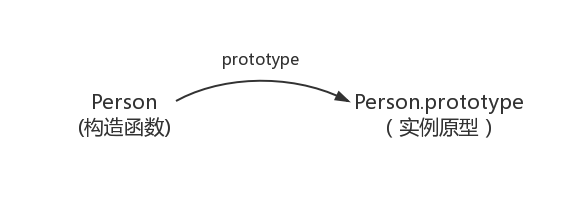
原型与继承参考文献 1 函数与对象的表面关系 函数是函数,对象是对象。 函数本身也是特殊对象,typeof 返回function。函数返回值可以是对象。 对象可以包含函数属性。typeof 返回object 函数可以作为对象的模板,称为对象构造器,typeof返回值,返回object。常见的内置类型构造器,首字母大写,通过new关键字,返回新的对象。new Array();new Function(); 变量可以指向函数,也可以指向对象。 函数的定义方法 function(){}匿名函数;或者function name(){} 对象的定义方法 new Creator();或者{}。从对象构造器中创建对象,或者直接创建对象。通过new创建的对象,proto指向Creator()对象构造器。通过{}创建的对象,proto指向Object()对象构造起,会形成,proto链。 2 原型函数原型 原型的概念:每一个javascript对象(除null外)创建的时候,就会与之关联另一个对象,这个对象就是我们所说的原型,每一个对象都会从原型中“继承”属性。 12345678functio...
2021-04-08
4.6 备忘录
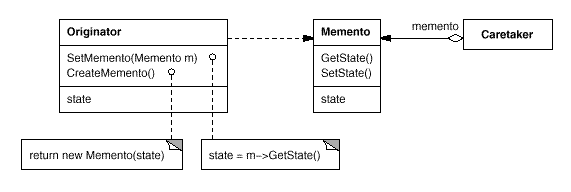
备忘录模式别名 Token 意图 在不破坏封装性的前提下,捕获一个对象的内部状态,并在该对象之外保存这个状态。这样以后就可将该对象恢复到原先保存的状态。 结构 参与者 Originator:原始对象 Caretaker:负责保存好备忘录 Memento:备忘录,存储原始对象的状态。备忘录实际上有两个接口,一个是提供给 Caretaker 的窄接口:它只能将备忘录传递给其它对象;一个是提供给 Originator 的宽接口,允许它访问到先前状态所需的所有数据。理想情况是只允许 Originator 访问本备忘录的内部状态。 适用性 在以下情况下可以使用 Memento 模式: 必须保存一个对象在某一个时刻的状态,这样以后需要时它才能恢复到先前的状态。 如果一个用接口来让其他对象直接得到的这些状态,将会暴露对象的实现细节并破坏对象的封装性。 效果 保持封装边界。 简化了 Originator。 定义窄接口和宽接口。 使用和维护 Memento 的潜在代价。 相关模式 可以使用 Memento 存储 Command 的内部状态,以支持撤销操作。 Memen...

2019-10-15
2.2 应用层-HTTP
WEB和HTTP1 HTTP概况概述 Web的应用层协议是超文本传输协议(HTTP),它是 Web 的核心。 HTTP 由两个程序实现:一个客户程序和一个服务器程序。客户程序和服务器程序运行在不同的端系统中,通过交换 HTTP 报文进行会话。 URL地址由两部分组成:存放对象的服务器主机名和对象的路径名 HTTP使用TCP作为它的支撑运输协议。客户首先发起一个与服务器的 TCP 连接。一旦该连接建立,该浏览器和服务器进程就可以通过套接字接口访问 TCP。 HTTP是一个无状态协议(stateless protocol)。服务器向客户发送被请求的文件,而不存储 任何该客户的状态信息。 Web使用了客户-服务器应用程序体系结构。 主要特点 支持C/S(客户/服务器)模式 简单快速:客户向服务器请求服务时,只需传送请求方法和路径。请求方法常用的有GET、HEAD、POST,每种方法规定了客户与服务器联系的类型不同。由于HTTP协议简单,使得HTTP服务器的程序规模小,因而通信速度很快。 灵活:HTTP允许传输任意类型的数据对象。正在传输的类型由Content-Ty...

2020-09-26
line_with_text
艺术家中的艺术家重写基本方法,以便一个艺术家对象可以包含另一个艺术家对象。在这种情况下,该行包含一个文本实例来为其添加标签。 1234567891011121314151617181920212223242526272829303132333435363738394041424344454647484950515253545556import numpy as npimport matplotlib.pyplot as pltimport matplotlib.lines as linesimport matplotlib.transforms as mtransformsimport matplotlib.text as mtextclass MyLine(lines.Line2D): def __init__(self, *args, **kwargs): # we'll update the position when the line data is set self.text = mtext.Text(0, 0, '...


