
02 AOP
1 AOP基本概念
概念
面向切面编程Aspect Oriented Programming
- 通过 预编译方式 和 运行期间动态代理 实现程序功能的统一维护的一种技术。
- AOP是OOP(面相对象编程)的延续。是函数式编程的一种衍生泛型。
- 利用AOP可以对业务逻辑的各个部分进行隔离。降低耦合度、提高可用性、提高开发效率
主要功能
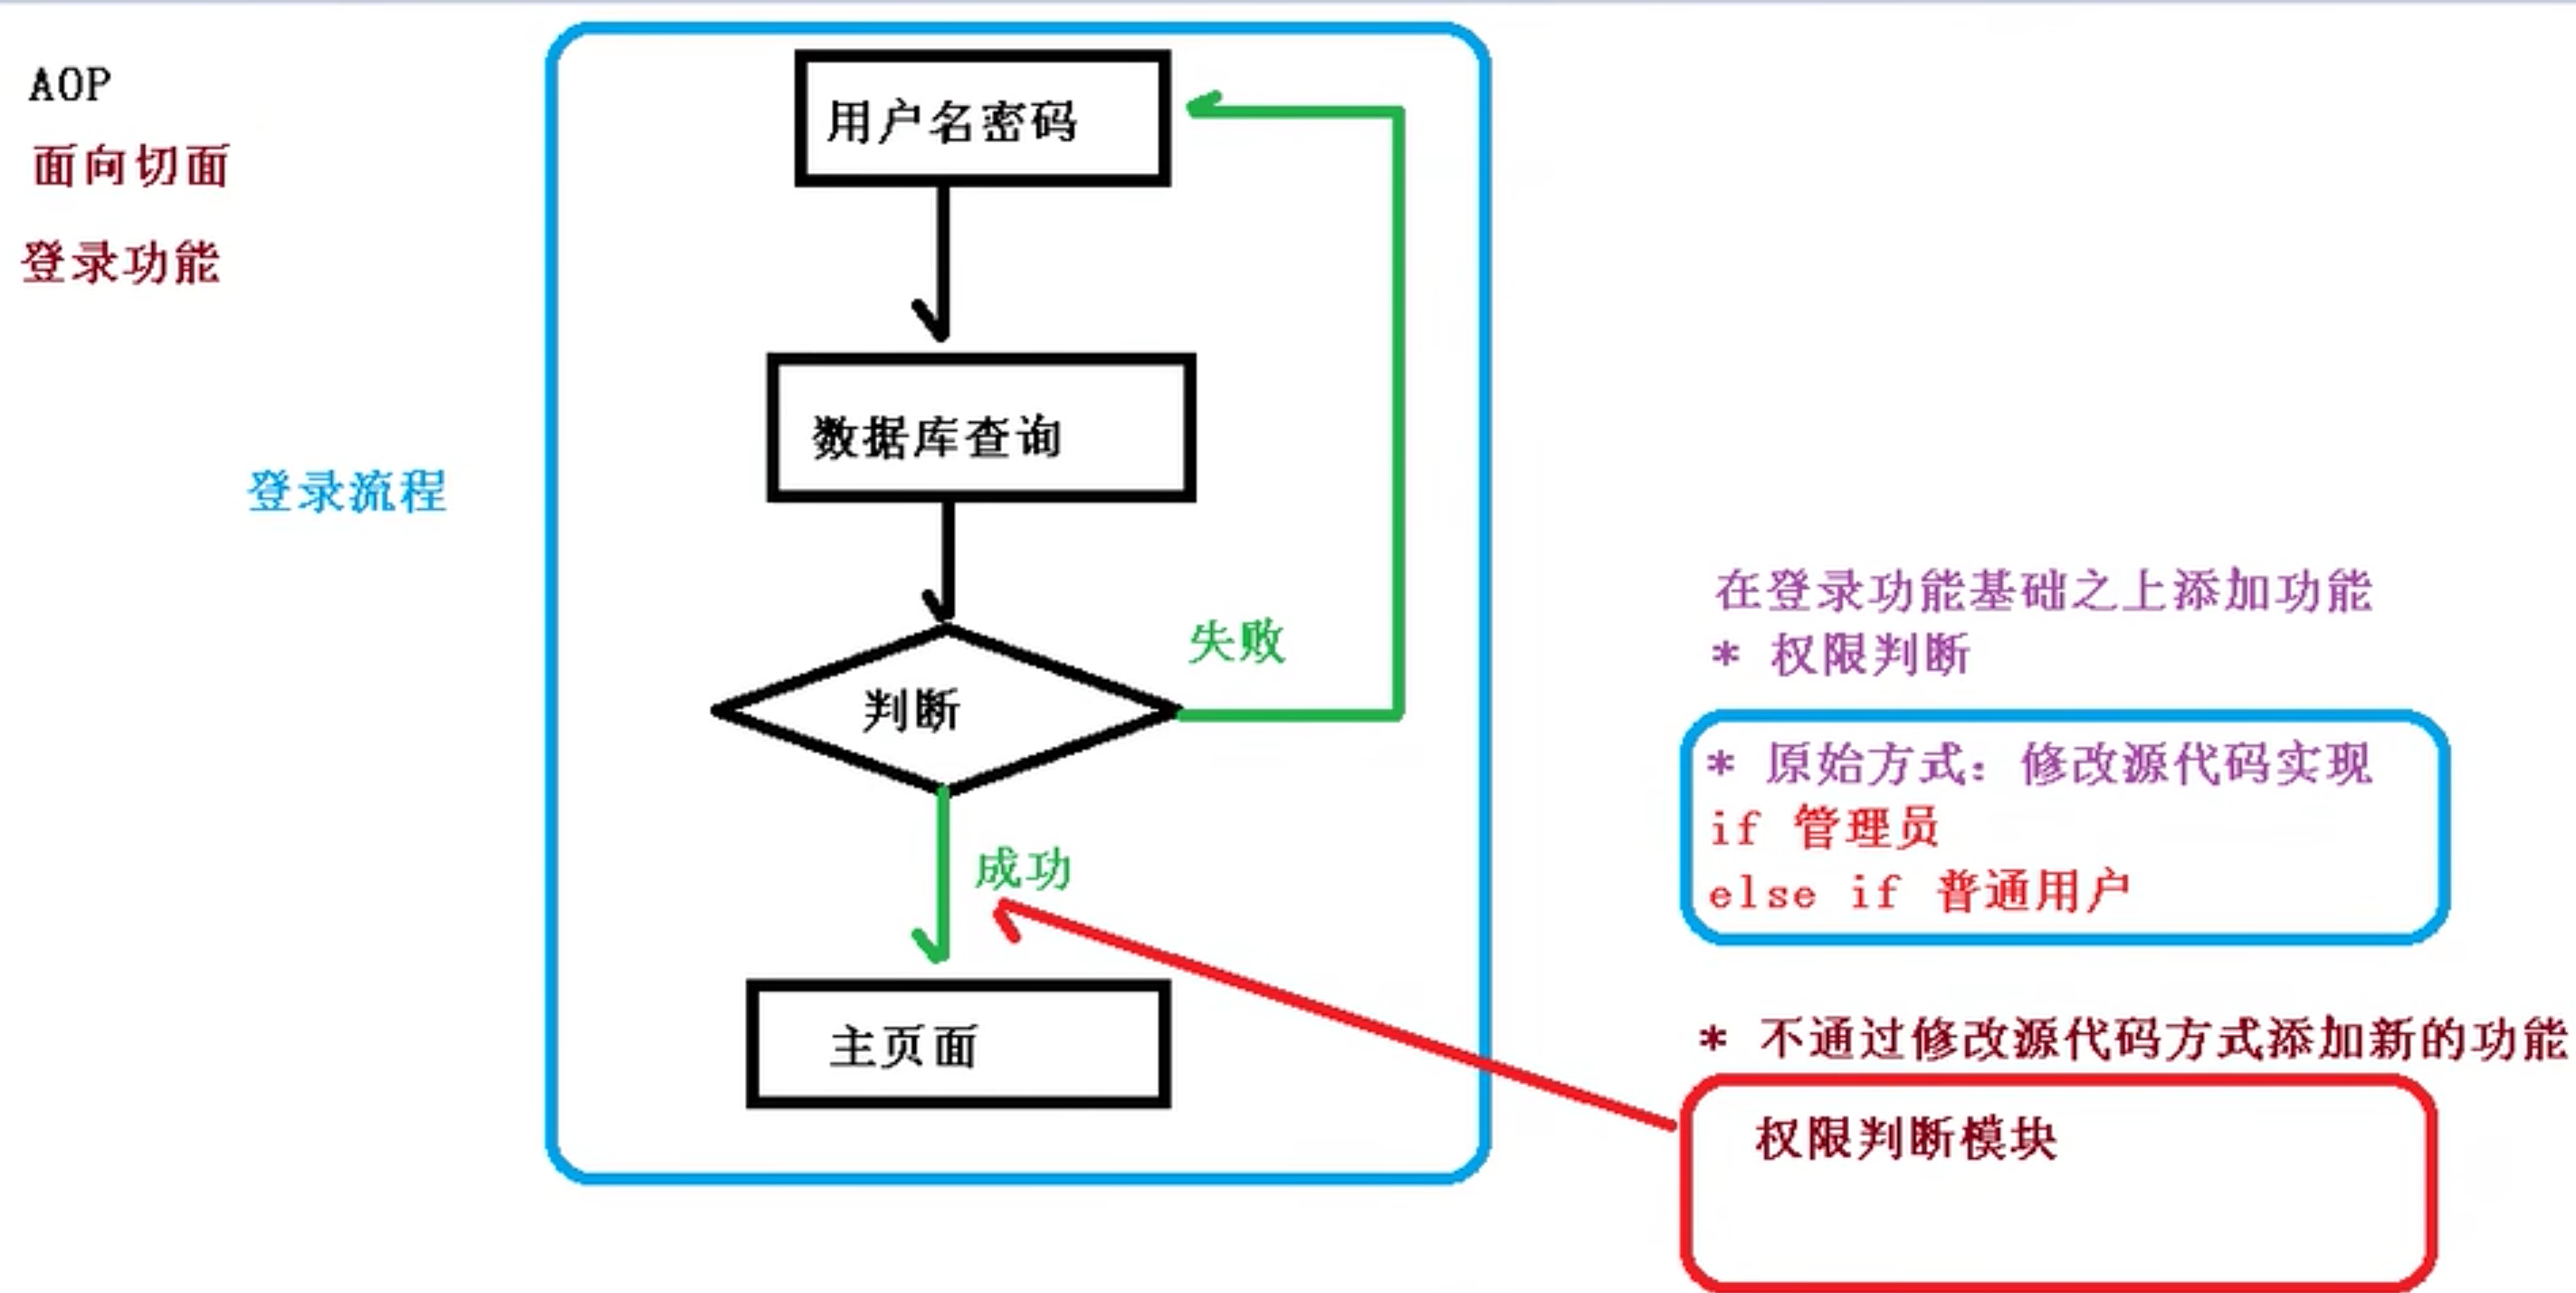
将日志记录、性能统计、安全控制、事务处理、异常处理等代码从业务逻辑代码中划分出来。
通俗描述:不通过修改源代码的方法,在主干功能里添加新功能
2 AOP底层原理
动态代理的原理
AOP使用动态代理实现面向切面编程
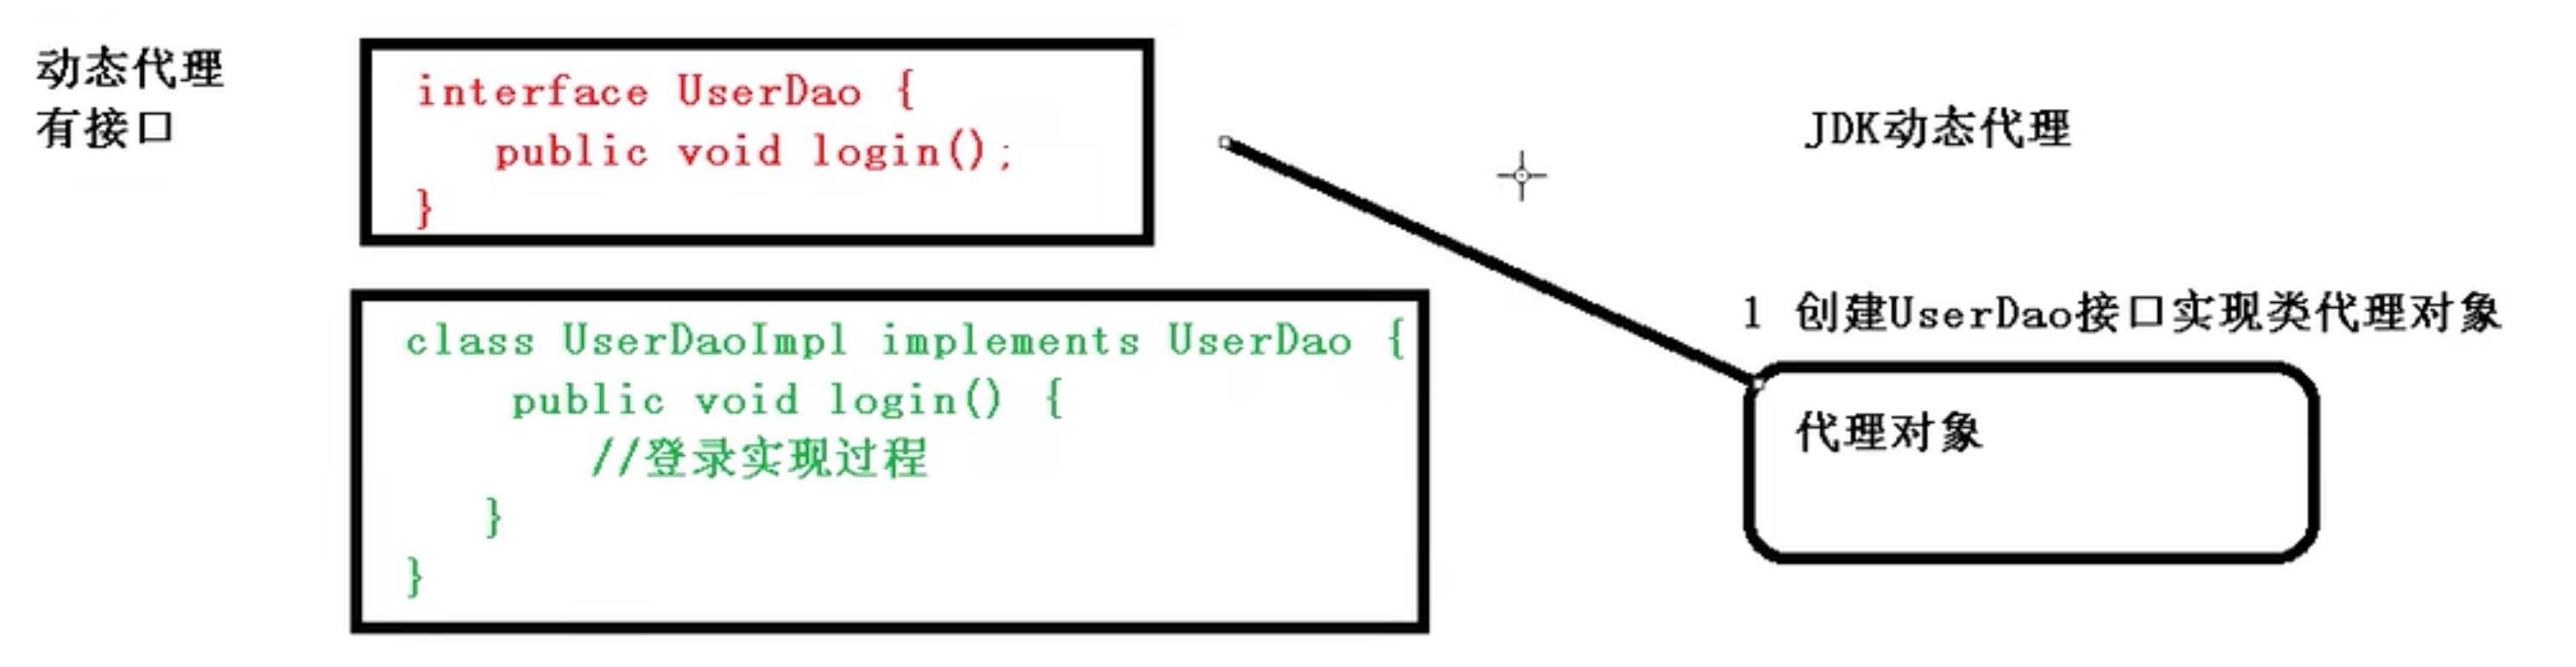
- 有接口情况,使用JDK动态代理
- 设计模式:代理模式。创建接口实现类代理对象,增强类的方法。
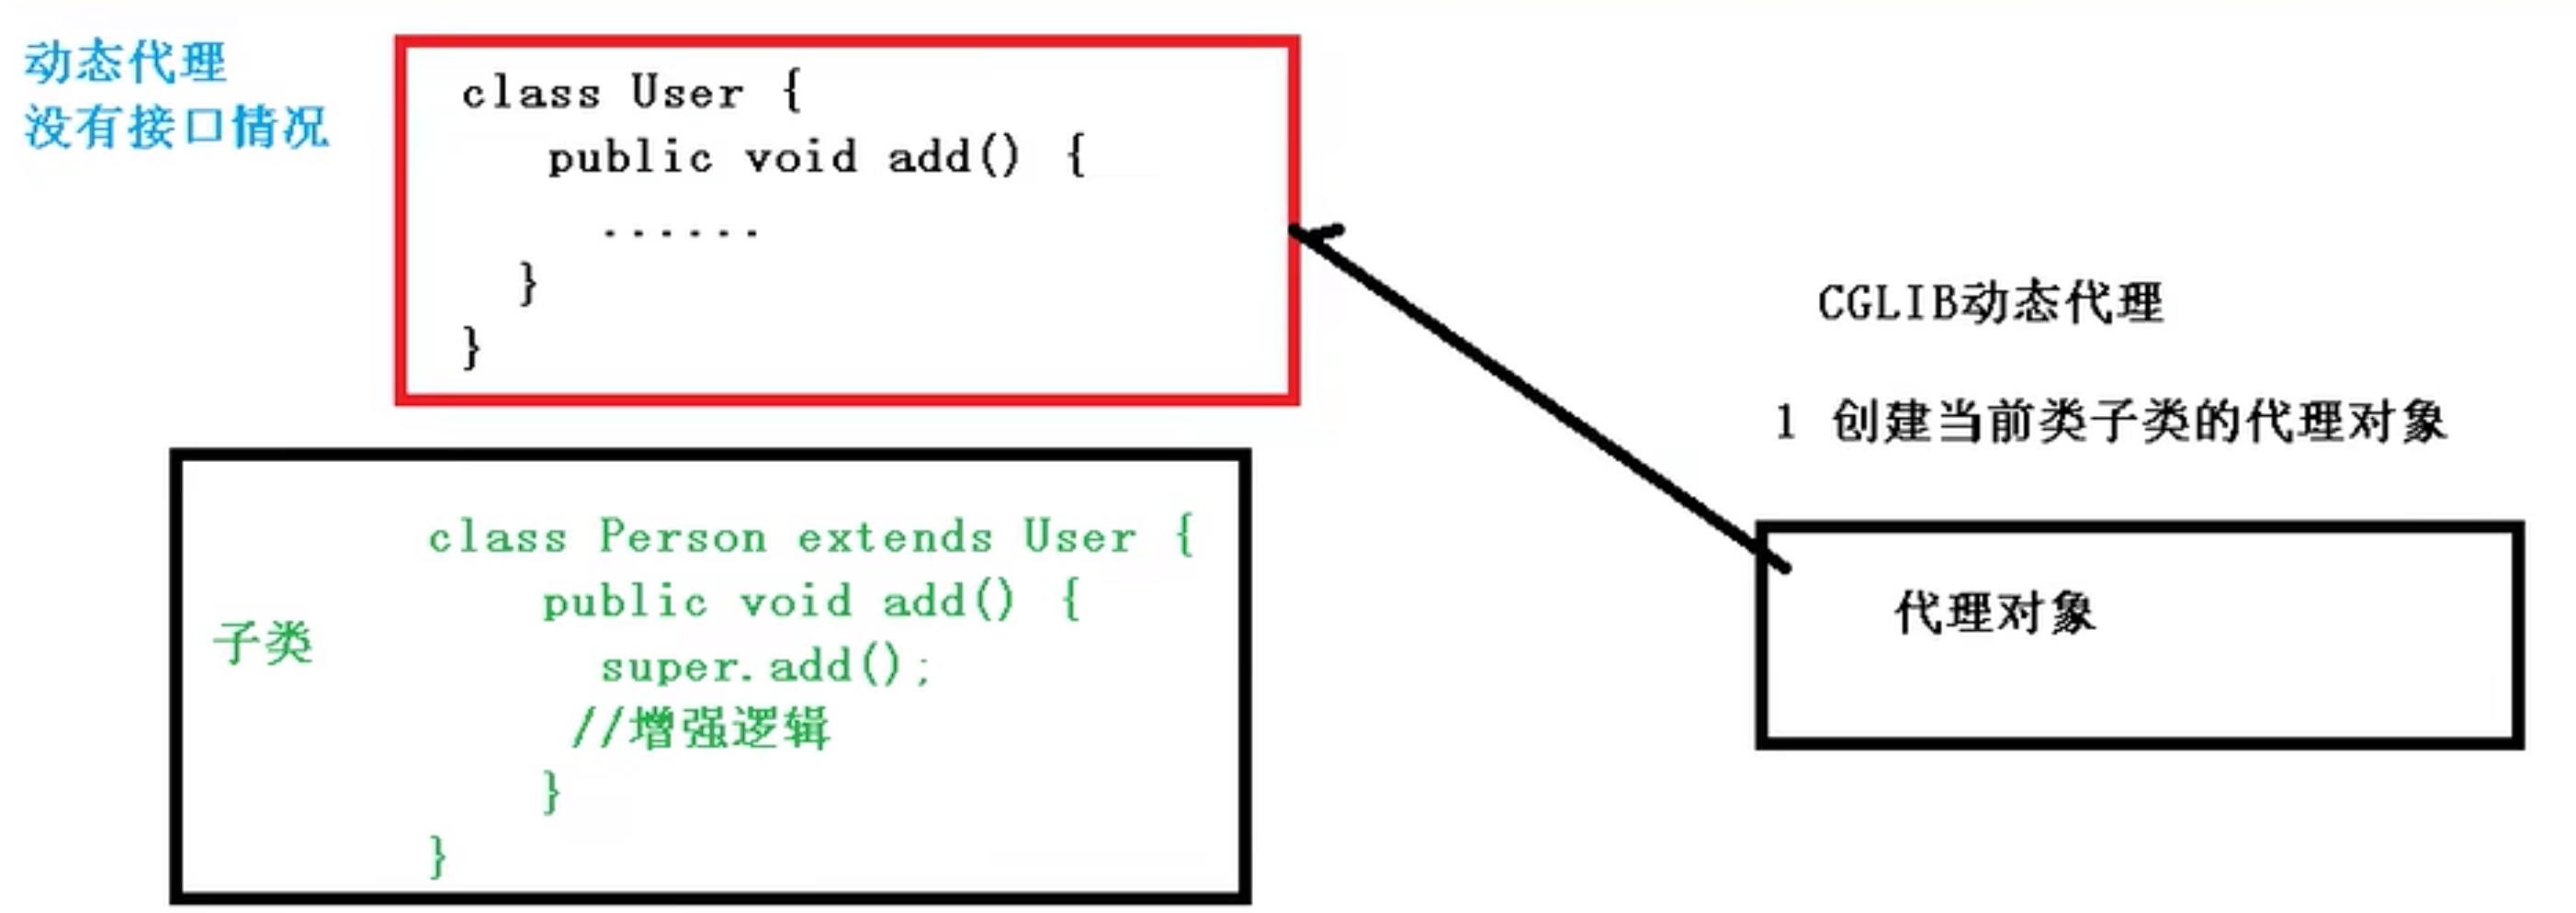
- 没有接口情况,使用CGLIB实现动态代理
- 创建子类继承原来的类。
- 创建当前类子类的代理对象,增强类中的方法。
动态代理的实现
- JDK 动态代理的实现。使用java.lang.reflect.Proxy,通过反射原理实现动态代理。
- 第一个参数:类加载器
- 第二个参数:被代理的接口
- 第三个参数:增强方法的逻辑,实现接口
1 | static Object newProxyInstance(ClassLoader loader, 类<?>[] interfaces, InvocationHandler h) |
- 编写JDK动态代理的代码
1 | package com.ykl.dao; |
3 术语
连接点
- 类中可以被增强的方法称为连接点
切入点
- 实际被真正增强的方法称为切入点
通知(增强)
实际增强的逻辑部分称为通知
通知的多种类型
- 前置通知Before。
- 后置通知AfterReturn。正常返回才有
- 环绕通知Around。通过切入点修改前后
- 异常通知AfterThrowing
- 最终通知After。finally无论出现异常都执行。
切面
切面是一个工作。
把通知应用到切入点的过程,就叫做切面。
4 AOP操作
AspectJ
在Spring框架中一般基于AspectJ实现AOP操作
AspectJ不是Spring的组成部分,独立AOP框架,一般把AspectJ和Spring框架一起使用,进行AOP操作。
基于AspectJ实现AOP操作有两种方式
- 基于XML配置文件实现
- 基于注解方式实现
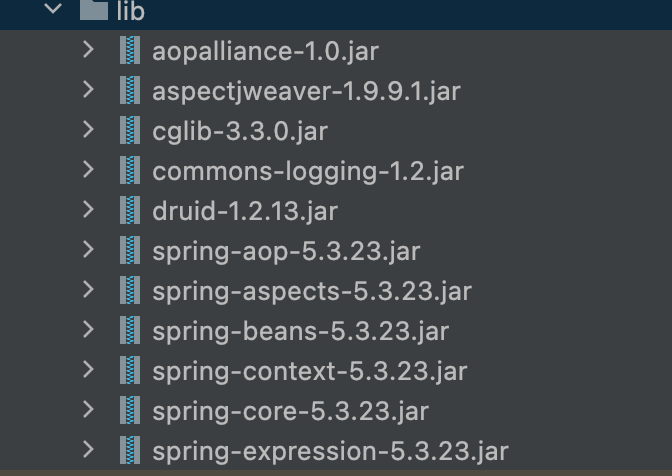
在项目中引入相关的依赖
切入点表达式
作用:知道要对哪个类、哪个方法进行增强。
语法结构
1 | execution([权限修饰符][返回类型][类全路径名][方法名称]([参数列表])) |
5 基于AspectJ注解AOP
使用步骤
- 创建类,在类中定义方法
1 |
|
- 创建增强类(编写增强逻辑)
- 在增强类里创建方法,不同的方法代表不同的名字。
1 |
|
- 进行通知的配置
- 在spring的配置文件中,开启注解扫描
- 使用注解创建User和UserProxy对象
- 在增强类上添加注解@Aspect
- 在spring配置文件中开启生成代理对象
1 |
|
- 配置不同类型的通知
- 在增强类里面,在作为通知的方法上面,添加通知类型的注解。并通过切入点表达式配置。
1 | /** |
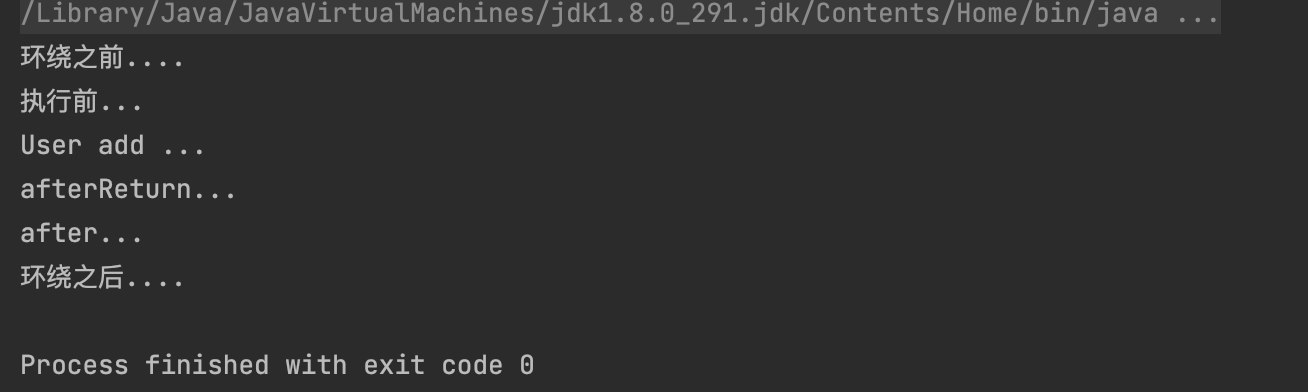
正常的执行顺序如下
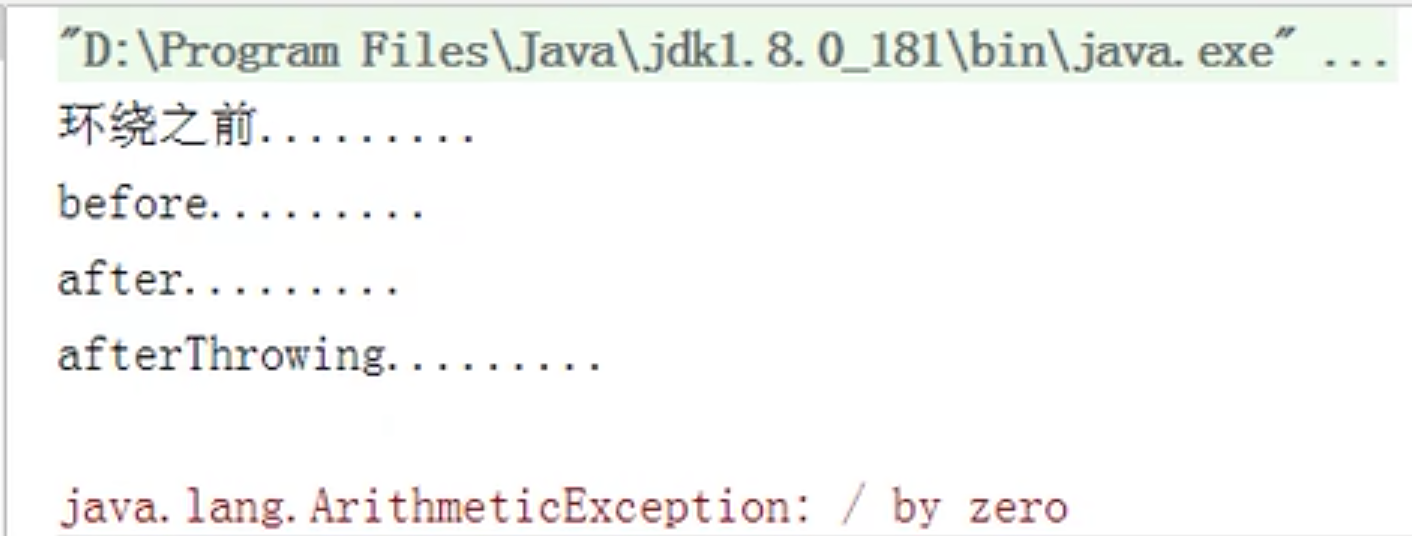
当抛出异常的时候执行顺序如下
@Pointcut公共切入点抽取
由于很多操作都具有相同的切入点,配置相同。所以可以抽取相同的切入点
1 |
|
@Order增强类的优先级
有多个增强类对同一个方法进行增强,设置增强类的优先级。
- 在增强类上面添加注解@Order(数字类型的值),数字类型值越小优先级越高。
1 |
|
完全注解开发
通过配置类代替XML的注解
1 | @Configuration |
6 基于AspectJ配置文件
- 创建两个类,增强类和被增强类,创建方法
- 在spring配置文件中创建两个类对象
- 在spring配置文件中配置切入点
1 |
|
本博客所有文章除特别声明外,均采用 CC BY-NC-SA 4.0 许可协议。转载请注明来源 Estom的博客!
相关推荐

2021-03-22
41 单机模型并行
单机模型并行最佳实践 原文:https://pytorch.org/tutorials/intermediate/model_parallel_tutorial.html 作者:Shen Li 模型并行在分布式训练技术中被广泛使用。 先前的帖子已经解释了如何使用DataParallel在多个 GPU 上训练神经网络; 此功能将相同的模型复制到所有 GPU,其中每个 GPU 消耗输入数据的不同分区。 尽管它可以极大地加快训练过程,但不适用于模型太大而无法容纳单个 GPU 的某些用例。 这篇文章展示了如何通过使用模型并行解决该问题,与DataParallel相比,该模型将单个模型拆分到不同的 GPU 上,而不是在每个 GPU 上复制整个模型(具体来说, 假设模型m包含 10 层:使用DataParallel时,每个 GPU 都具有这 10 层中的每一个的副本,而当在两个 GPU 上并行使用模型时,每个 GPU 可以承载 5 层。 模型并行化的高级思想是将模型的不同子网放置在不同的设备上,并相应地实现forward方法以在设备之间移动中间输出。 由于模型的一部分仅在任何单个设备上运行...

2020-09-26
lasso_demo
套索演示演示如何使用套索选择一组点并获取所选点的索引。回调用于更改所选点的颜色。 这是一个概念验证实现(尽管它可以按原样使用)。将对API进行一些改进。 1234567891011121314151617181920212223242526272829303132333435363738394041424344454647484950515253545556575859606162636465666768697071727374757677from matplotlib import colors as mcolors, pathfrom matplotlib.collections import RegularPolyCollectionimport matplotlib.pyplot as pltfrom matplotlib.widgets import Lassoimport numpy as npclass Datum(object): colorin = mcolors.to_rgba("red") colorout = mcolor...
2020-10-11
11机器学习系统设计
垃圾邮件分类系统误差分析机器学习实现的步骤 用最简单的算法快速实现机器学习过程。然后通过交叉验证数据集对模型进行测试。 画出学习曲线,通过检验误差,找出算法存在的高偏差、高方差问题。决定是否使用更多的数据和更多的特征。(不要过早的选择模型进行优化,应该首先对数据的特征进行分析。) 误差分析。通过分析错误数据,找到错误的原因,然后对机器学习算法进行改进。 数值估计。可以有效的改进机器学习算法。数值评估指标,来改进算法执行的效果。对数据进行特殊处理,例如只取邮件单词向量中单词前五个字母来训练数据。使用交叉验证错误率,来判断是否采取某项特殊处理。尝试各种不同的对算法的改进,然后使用交叉验证的方法,分析错误率的变化。 词干提取算法。 对算法的选择和改进 算法评估 误差分析 不对称分类的误差评估偏斜类 一个类别中的数据与另外一个类别中的数据量相差很大。 使用不同的方法,衡量偏斜类分类问题的准确率。 查准率和召回率 查准率:预测真实真值/预测真值。 召回率:预测真实真值/真实真值 在数理统计中使用第一类错误和第二类错误来描述查准率和召回率。只有增加样本的数量...
2023-08-15
01 简介
基本介绍简介Operator 是由 CoreOS 开发的,用来扩展 Kubernetes API,特定的应用程序控制器,它用来创建、配置和管理复杂的有状态应用,如数据库、缓存和监控系统。Operator 基于 Kubernetes 的资源和控制器概念之上构建,但同时又包含了应用程序特定的领域知识。创建Operator 的关键是CRD(自定义资源)的设计。 Operator 直接使用 Kubernetes API进行开发,也就是说他们可以根据这些控制器内部编写的自定义规则来监控集群、更改 Pods/Services、对正在运行的应用进行扩缩容。 Operator pattern首先由 CoreOS 提出,通过结合 CRD 和 custom controller 将特定应用的运维知识转换为代码,实现应用运维的自动化和智能化。Operator 允许 kubernetes 来管理复杂的,有状态的分布式应用程序,并由 kubernetes 对其进行自动化管理,例如,etcd operator 能够创建并管理一组 etcd 集群, 定制化的 controller 组件了解这些资源,...
2021-09-02
14 Redis使用场景
https://blog.csdn.net/zh15732621679/article/details/80614091 1 Redis使用场景计数器可以对 String 进行自增自减运算,从而实现计数器功能。 Redis 这种内存型数据库的读写性能非常高,很适合存储频繁读写的计数量。 缓存将热点数据放到内存中,设置内存的最大使用量以及淘汰策略来保证缓存的命中率。 查找表例如 DNS 记录就很适合使用 Redis 进行存储。 查找表和缓存类似,也是利用了 Redis 快速的查找特性。但是查找表的内容不能失效,而缓存的内容可以失效,因为缓存不作为可靠的数据来源。 消息队列List 是一个双向链表,可以通过 lpush 和 rpop 写入和读取消息 不过最好使用 Kafka、RabbitMQ等消息中间件。 会话缓存可以使用 Redis 来统一存储多台应用服务器的会话信息。 当应用服务器不再存储用户的会话信息,也就不再具有状态,一个用户可以请求任意一个应用服务器,从而更容易实现高可用性以及可伸缩性。 分布式锁实现在分布式场景下,无法使用单机环境下的锁来对多个节点上的进程进行同步。 ...

2021-09-02
03-日志记录
概述上篇文章分享了 Gin 框架的路由配置,这篇文章分享日志记录。 查了很多资料,Go 的日志记录用的最多的还是 github.com/sirupsen/logrus。 Logrus is a structured logger for Go (golang), completely API compatible with the standard library logger. Gin 框架的日志默认只会在控制台输出,咱们利用 Logrus 封装一个中间件,将日志记录到文件中。 这篇文章就是学习和使用 Logrus 。 日志格式比如,我们约定日志格式为 Text,包含字段如下: 请求时间、日志级别、状态码、执行时间、请求IP、请求方式、请求路由。 接下来,咱们利用 Logrus 实现它。 Logrus 使用用 dep 方式进行安装。 在 Gopkg.toml 文件新增: 123[[constraint]] name = "github.com/sirupsen/logrus" version = "1.4.2" 在项目中导入: ...


