
04 事务
事务
1 简介
事务概念
事务是数据库操作最近本的单元,逻辑上一组操作,要么都成功,如果有一个失败,所有的都失败。
事务有四大特性ACID
- 原子性,不可分割
- 一致性,多个事务看到的数据是一致的
- 隔离性,多个事务不会产生影响
- 持久性,可以持久化
准备环境
- 创建service和dao层的bean(设计代码架构)
- 实现转账的业务逻辑(开发业务逻辑)
- 撰写测试用例进行测试(测试代码)
2 事务步骤
操作步骤
- 开启事务操作
- 进行业务操作,并添加异常处理
- 没有发生异常,提交事务。
- 第四部 出现异常事务回滚
Spring事务管理介绍
事务添加到三层结构的service层
在spring进行事务管理操作
声明式事务管理。通过配置实现。
编程式事务管理。需要写代码
生命式事务管理
- 注解方式
- xml配置文件方式
在Spring进行声明式事务管理,底层使用AOP
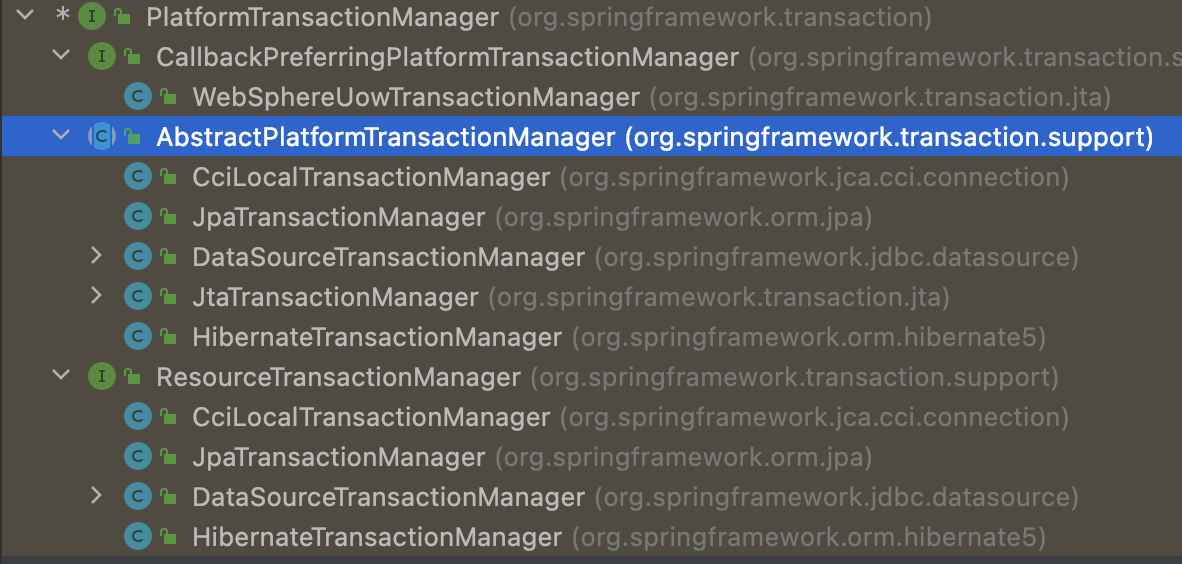
提供一个接口,代表事务管理。针对不同的框架提供了不同的实现类。 事务管理器
3 基于注解的声明式事务管理
步骤
- 配置事务管理器
1 | ``` |
1 | <!--开启事务注解--> |
- 在service类上添加事务注解。或者在方法上。@Transactional.
- 在类上,所有的类都开启事务。
- 在方法上,在某个方法上开启事务。
1 |
|
3 声明式事务管理参数配置
propagation传播行为
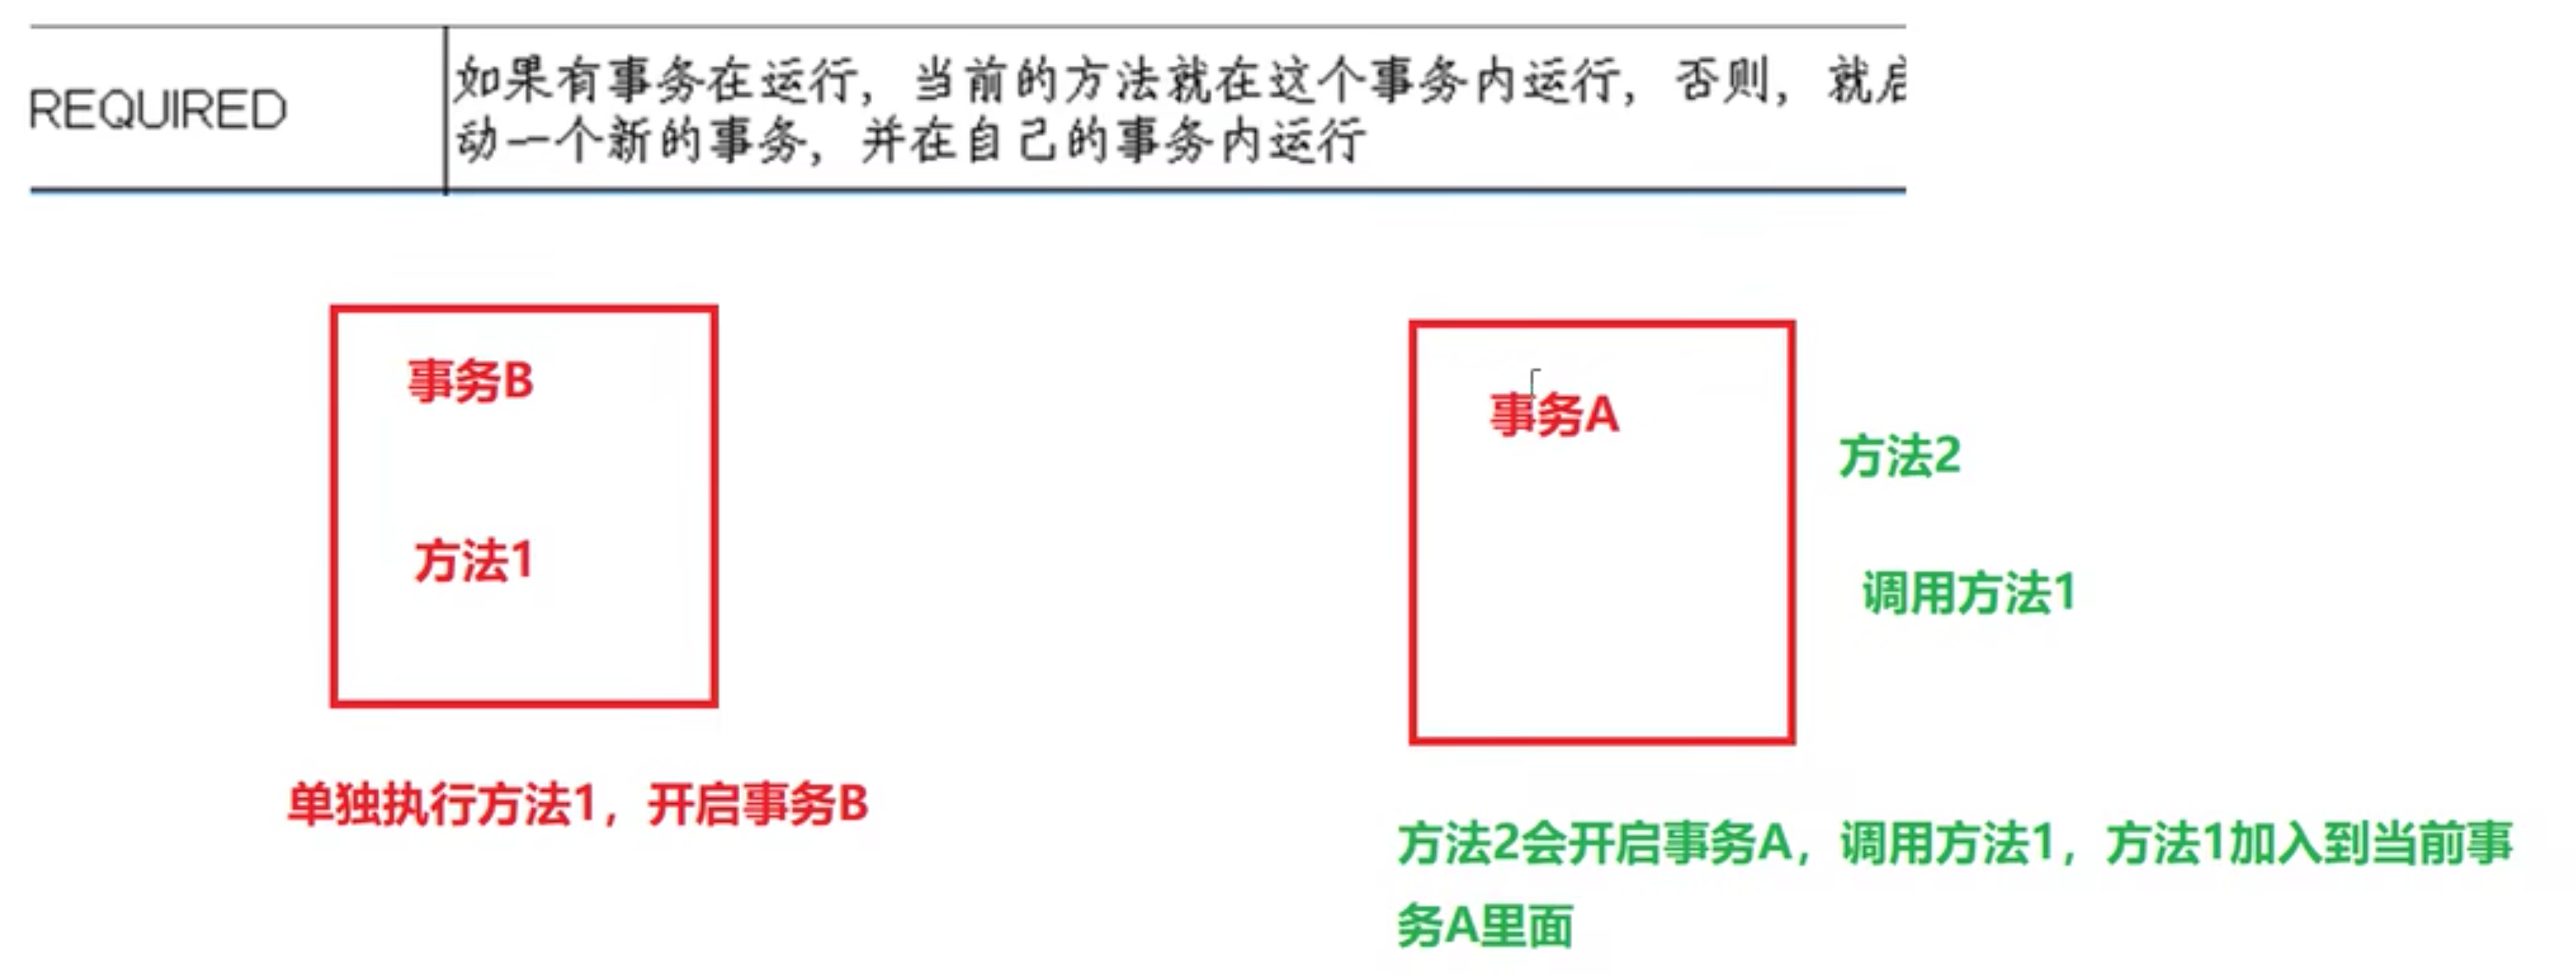
propagation 传播行为。当一个事物方法,被另一个事物调用的时候。
Required如果有事务在运行,当前的方法就在这个事务内运行,否则就启动一个新的事物,并在自己的事务内运行。
Required_NEW 当前方法必须启动新事物,并在他自己的事务内运行,如果有事务正在运行,应该将它挂起。(外层事务对内层事务不影响,外层事务执行失败回滚,不影响已经提交的内层事务)

SUPPORTS 如果有事务在运行,当前的方法就在这个事务内运行,否则它可以不运行在事务中

1 |
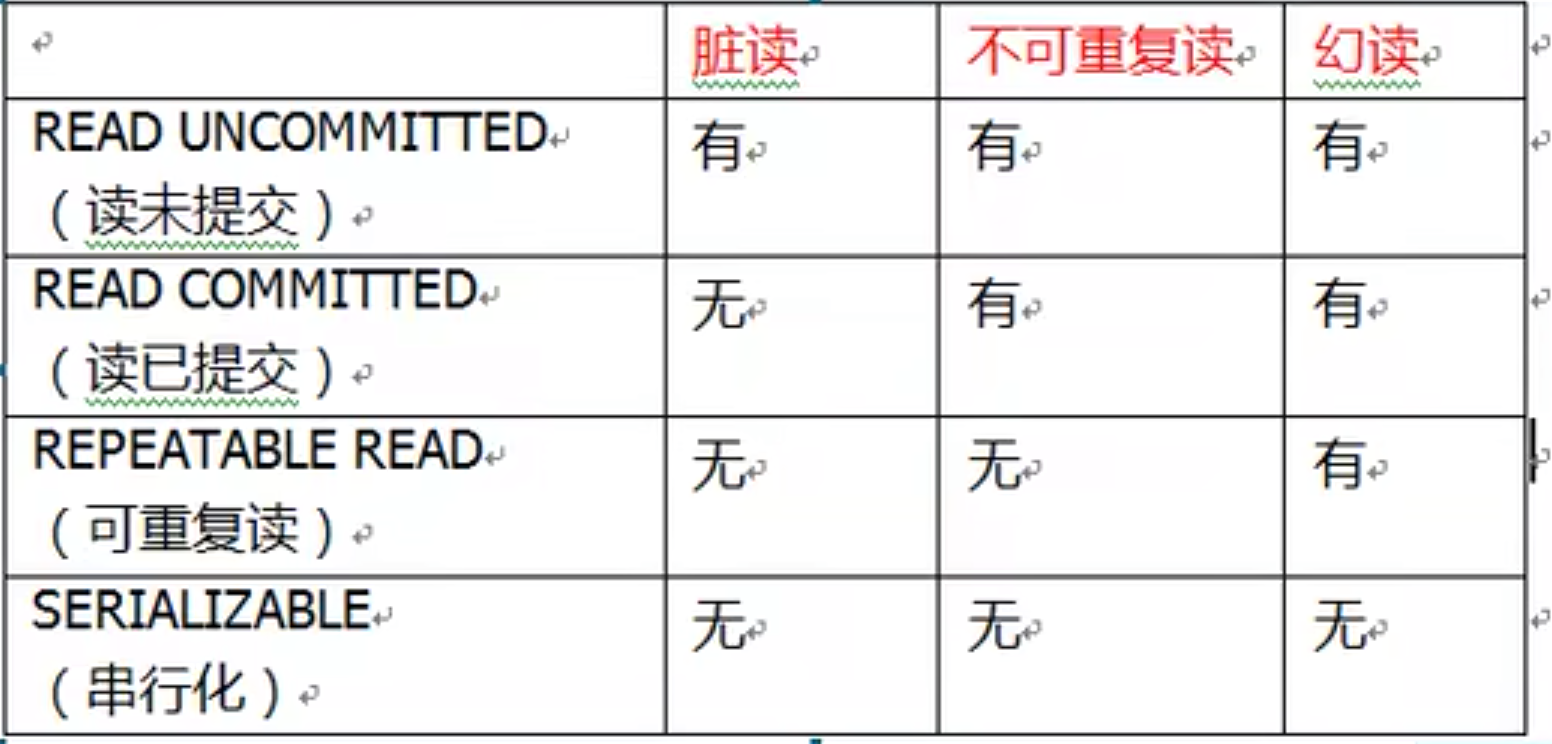
isolation隔离级别
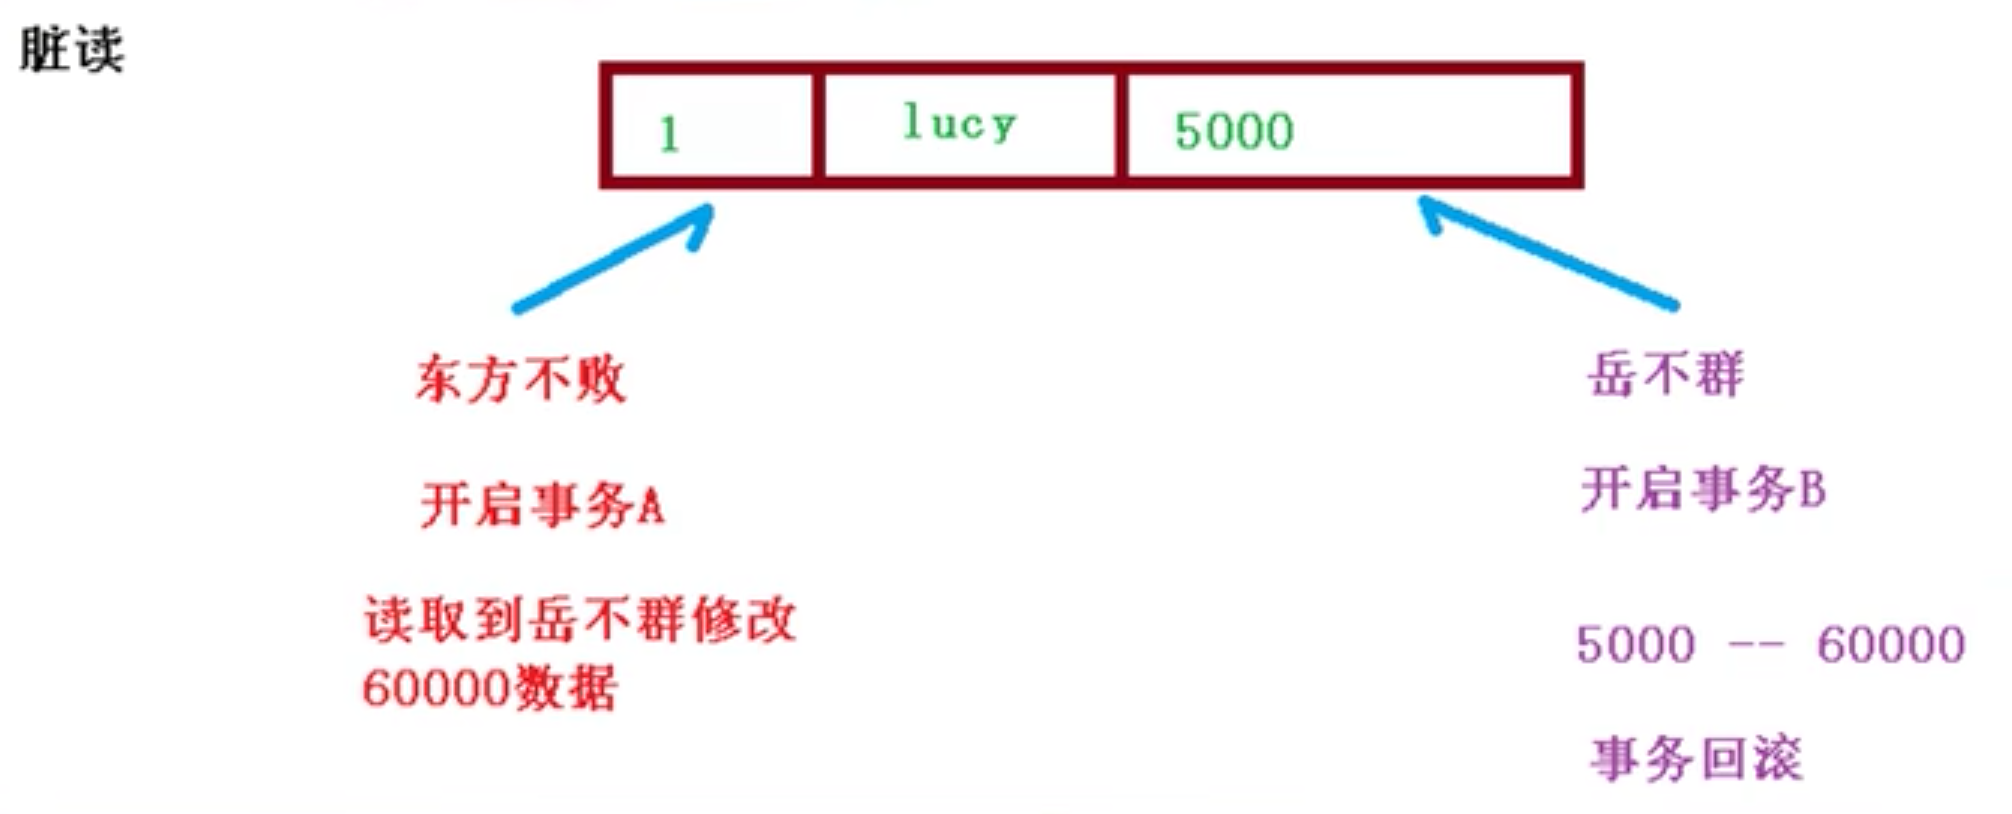
事务特性:隔离性。多事务操作的时候不会产生影响。不考虑隔离性会产生一系列问题。
- 脏读,读到其他事务未提交的数据
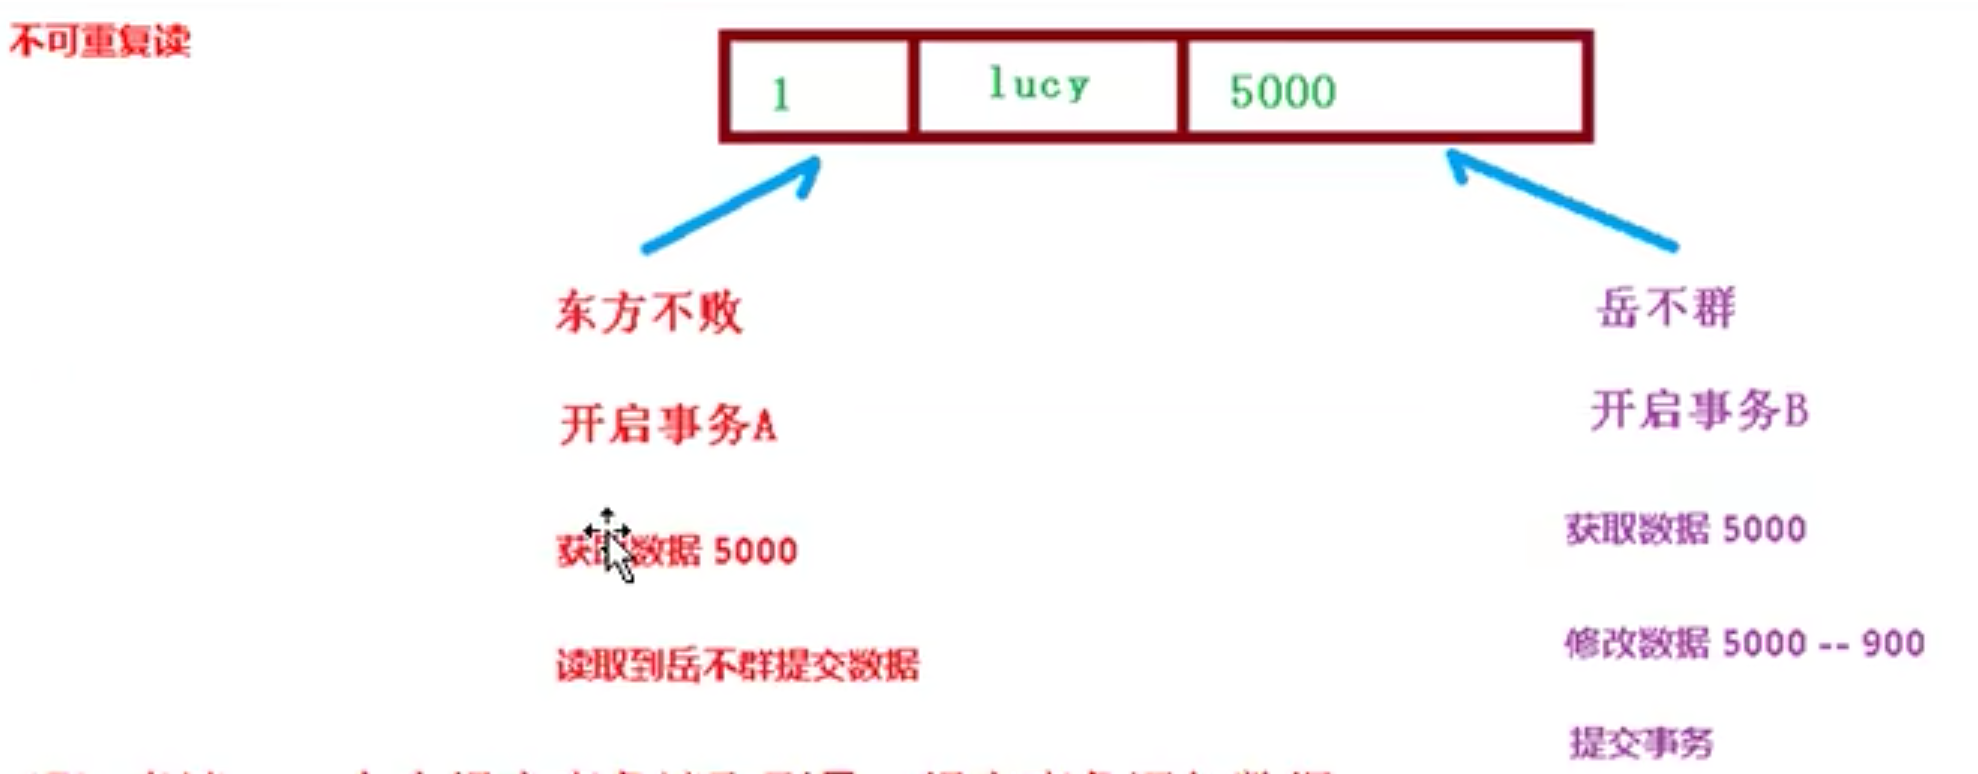
- 不可重复读,同一个事物内读取的数据不一致,被修改
- 幻读,读到另一个数据添加的数据,例如30条数据,在后边读的时候,变成了31条。
使用不同的事务隔离级别。设置事务的隔离性,解决读的问题。
1 |
timeout 超时时间
- 事务需要再一定时间内进行提交,如果不提交进行回滚
- 默认超时时间为-1,设置时间以秒为单位进行计算
1 |
ReadOnly 是否只读
读:查询操作
写:添加、修改、删除
默认是false,表示可以查询,可以添加修改删除。
可以修改为true,只能查询。
1 |
rollbackFor & noRollbackFor异常回滚
- rollbackFor设置出现那些异常进行事务回滚。
- noRollbackFor设置出现哪些异常不进行回滚。
4 基于XML声明式事务管理
- 在Spring配置文件中进行配置,配置事务管理器
- 配置通知
- 配置切入点和切面
能够很明显地显示事务配置的原理。xml配置的好处就是对源代码没有任何入侵。只要更改代码就可以。
1 |
|
4 完全注解开发
- 创建配置类,使用配置类替代xml配置文件
- @Configuration
- @Bean可以将返回值注册为bean。并且可以自动装配参数。
- AnnotationConfigApplicationContext(Config.class)可以加载配置类。
本博客所有文章除特别声明外,均采用 CC BY-NC-SA 4.0 许可协议。转载请注明来源 Estom的博客!
相关推荐

2019-11-30
单源最短路问题
单元最短路问题 通过不同的方式解决单元最短路问题 图,不是树 0 问题描述单元最短路问题、有向无环图 1 暴力求解深度优先搜索DFS广度优先搜索BFS2 回溯法深度优先算法,每次回溯的时候进行剪枝操作。如果此分支没有希望比已经保存的最短路更优。 而且可以从不同的点到达同一个点。保留之前到达这个点的状态,如果最新到达这个点的距离小于之前的距离,则继续向下走,如果大于则放弃并回溯。

2021-09-07
7.3-chinese
7.3 对于设计无锁数据结构的指导建议本章中的例子中,看到了一些复杂的代码可让无锁结构工作正常。如果要设计自己的数据结构,一些指导建议可以帮助你找到设计重点。第6章中关于并发通用指导建议还适用,不过这里需要更多的建议。我从例子中抽取了几个实用的指导建议,在你设计无锁结构数据的时候就可以直接引用。 7.3.1 指导建议:使用std::memory_order_seq_cst的原型std::memory_order_seq_cst比起其他内存序要简单的多,因为所有操作都将其作为总序。本章的所有例子,都是从std::memory_order_seq_cst开始,只有当基本操作正常工作的时候,才放宽内存序的选择。在这种情况下,使用其他内存序就是进行优化(早起可以不用这样做)。通常,当你看整套代码对数据结构的操作后,才能决定是否要放宽该操作的内存序选择。所以,尝试放宽选择,可能会让你轻松一些。在测试后的时候,工作的代码可能会很复杂(不过,不能完全保证内存序正确)。除非你有一个算法检查器,可以系统的测试,线程能看到的所有可能性组合,这样就能保证指定内存序的正确性(这样的测试的确存在),仅是执...

2021-12-24
lvreduce
lvreduce收缩逻辑卷空间 补充说明lvreduce命令 用于减少LVM逻辑卷占用的空间大小。使用lvreduce命令收缩逻辑卷的空间大小有可能会删除逻辑卷上已有的数据,所以在操作前必须进行确认。 语法1lvreduce(选项)(参数) 选项12-L:指定逻辑卷的大小,单位为“kKmMgGtT”字节;-l:指定逻辑卷的大小(LE数)。 参数逻辑卷:指定要操作的逻辑卷对应的设备文件。 实例使用lvreduce命令减少指定的逻辑卷的空间大小。在命令行中输入下面的命令: 1[root@localhost ~]# lvreduce -L -50M /dev/vg1000/lvol0 #将逻辑卷的空间大小减少50M 输出信息如下: 1234......省略部分输出内容...... Do you really want to reduce lvol0? [y/n]: y #确认操作 Reducing logical volume lvol0 to 252.00 MB Logical volume lvol0 successfully resized
2021-04-08
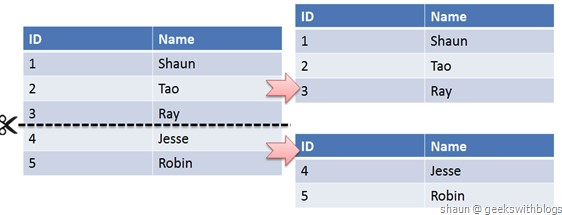
附录6 MySQL分库分表
MySQL分库分表和主从分离1 概述分库分表的原因当一张表的数据达到几千万时,查询一次所花的时间会变多,如果有联合查询的话,有可能会死在那儿了。分表的目的就在于此,减小数据库的负担,缩短查询时间。 用户请求量太大。因为单服务器TPS,内存,IO都是有限的。解决方法:分散请求到多个服务器上; 其实用户请求和执行一个sql查询是本质是一样的,都是请求一个资源,只是用户请求还会经过网关,路由,http服务器等。 单库太大。单个数据库处理能力有限;单库所在服务器上磁盘空间不足;单库上操作的IO瓶颈 解决方法:切分成更多更小的库 单表太大。CRUD都成问题;索引膨胀,查询超时。解决方法:切分成多个数据集更小的表。 分库分表的形式 单库单表。单库单表是最常见的数据库设计,例如,有一张用户(user)表放在数据库db中,所有的用户都可以在db库中的user表中查到。 单库多表。随着用户数量的增加,user表的数据量会越来越大,当数据量达到一定程度的时候对user表的查询会渐渐的变慢,从而影响整个DB的性能。如果使用mysql, 还有一个更严重的问题是,当需要添加一列的时候,mysq...

2020-10-13
16_Unsupervised Learning Introduction
Unsupervised Learning: IntroductionUnsupervised Learning无监督学习(Unsupervised Learning)可以分为两种: 化繁为简 聚类(Clustering) 降维(Dimension Reduction) 无中生有(Generation) 对于无监督学习(Unsupervised Learning)来说,我们通常只会拥有$(x,\hat y)$中的$x$或$\hat y$,其中: 化繁为简就是把复杂的input变成比较简单的output,比如把一大堆没有打上label的树图片转变为一棵抽象的树,此时training data只有input $x$,而没有output $\hat y$ 无中生有就是随机给function一个数字,它就会生成不同的图像,此时training data没有input $x$,而只有output $\hat y$ ClusteringIntroduction聚类,顾名思义,就是把相近的样本划分为同一类,比如对下面这些没有标签的image进行分类,手动打上cluster 1、...

2021-03-09
基础篇——4.SQL
1 数据库基本对象DDL(数据库定义语言) sql 不提供修改模式定义和修改视图定义的操作。如果想要更改,智能删除重建。数据库中操作的基本对象主要有以下内容:模式、表、视图、索引 1.1 基本对象概述 主要包括增删改。没有针对基本对象的查询。就像你会查询表中的数据,但是不会查询存在的某一张表。查询表不存在,应该是查询表中的数据。 操作对象 创建 删除 修改 模式SCHEMA CREATE SCHEMA DROP SCHEMA 表TABLE CREATE TABLE DROP TABLE ALTER TABLE 视图VIEW CREATE VIEW DROP VIEW 索引INDEX CREATE INDEX DROP INDEX ALTER INDEX 字段COLUMN ADD COLUMN DROP COLUMN ALTER COLUMN 12345graph LR模式Schema-->表Table模式Schema-->视图View表Table-->索引Index表Table-->字段Colume 基本对象的...


