
01 3IOC基于注解容器管理
IOCBean管理基于注解方式
基于注解方式IOCBean管理
1 简介
注解概念
- 注解是代码特殊标记,格式:@注解名称(属性名称=属性值,属性名称=属性值)
- 注解的位置:注解可以作用在类、属性、方法。
- 使用目的:简化XML配置
IOC的两个步骤
- 创建对象
- 注入属性
2 基于注解方式创建对象
实现创建对象的注解
四个注解功能是一样的,都可以用来创建bean实例。
- @Component 组件层
- @Service service层
- @Controller web层
- @Repository DO层
使用注解创建对象bean的步骤
- 引入依赖。spring-aop(该jar包实现了注解)
- 开启组件扫描(context命名空间,添加扫描)
- 检测到组件扫描,会扫描包下的所有类。
- 可以通过filters过滤
1 |
|
- 在类上添加注解,创建对象的bean
1 | /** |
context扫描设置
- 使用自己配置的filter。use-default-filter=”false
- context:include-filter只扫描指定注解
- context:exclude-filter不扫描指定注解
1 | <context:componet-scan base-package="com.atguigu" use-default-filters="false"> |
3 基于注解方式实现属性注入
实现属性注入的注解
- @Autowired:根据属性类型进行自动装配
- @Qualifier:根据属性名称进行注入
- @Resource:可以根据属性类型、属性名称进行注入
- @Value:注入普通类型的属性
@Autowire基于注解的属性注入步骤
- 在service和dao对象类上添加创建对象的注解。
- 在service中注入dao对象,在Service类中添加dao类型属性,在属性上使用注解。
1 | @Service |
@Qualifier根据名称进行注入
- 必须跟Autowire配合使用。因为根据类型注入存在歧义的时候,使用名称进行区分(id)
1 | @Autowired |
@Resource属性注入
Resource是javax扩展包中的注解
- 默认值为根据类型进行注入
- 根据名称进行注入,使用name属性
1 |
@Value注入普通属性
1 |
|
4 完全注解开发
可以不用xml配置文件。
相关注解
- @Configuration
- @ComponentScan
完全注解开发流程
- 创建配置类,代替xml配置文件。
1 | @Configuration |
- 编写测试类
1 | @Test |
本博客所有文章除特别声明外,均采用 CC BY-NC-SA 4.0 许可协议。转载请注明来源 Estom的博客!
相关推荐

2022-04-18
01 简介
JavaScript 介绍什么是 JavaScriptJavaScript 是一种由 Netscape 的 LiveScript 发展而来的原型化继承的基于对象的动态类型的区分大小写的客户端脚本语言,主要目的是为了解决服务器端语言,比如 Perl,遗留的速度问题,为客户提供更流畅的浏览效果。 当时服务端需要对数据进行验证,由于网络速度相当缓慢,只有 28.8kbps,验证步骤浪费的时间太多。于是 Netscape 的浏览器 Navigator 加入了 JavaScript,提供了数据验证的基本功能。 JavaScript,一种直译式脚本语言,是一种动态类型、弱类型、基于原型的语言,内置支持类型。它的解释器被称为 JavaScript 引擎,为浏览器的一部分,广泛用于客户端的脚本语言,最早是在 HTML 网页上使用,用来给HTML网页增加动态功能。然而现在 JavaScript 也可被用于网络服务器,如 Node.js。 JavaScript发展历史 在 1995 年由 Netscape (网景)公司推出 LiveScript。在此之前,没有所谓的前端技术。所有的处理都需要由服务器...

2021-12-24
blkid
blkid查看块设备的文件系统类型、LABEL、UUID等信息 补充说明在Linux下可以使用 blkid命令 对查询设备上所采用文件系统类型进行查询。blkid主要用来对系统的块设备(包括交换分区)所使用的文件系统类型、LABEL、UUID等信息进行查询。要使用这个命令必须安装e2fsprogs软件包。 语法1234blkid -L | -Ublkid [-c ] [-ghlLv] [-o] [-s ][-t ] -[w ] [ ...]blkid -p [-s ] [-O ] [-S ][-o] ...blkid -i [-s ] [-o] ... 选项123456789101112131415161718192021-c <file> # 指定cache文件(default: /etc/blkid.tab, /dev/null = none)-d # don't encode non-printing characters-h # 显示帮助信息-g # garbage collect the ...
2021-12-24
sh
shshell命令解释器 补充说明sh命令 是shell命令语言解释器,执行命令从标准输入读取或从一个文件中读取。通过用户输入命令,和内核进行沟通!Bourne Again Shell (即bash)是自由软件基金会(GNU)开发的一个Shell,它是Linux系统中一个默认的Shell。Bash不但与Bourne Shell兼容,还继承了C Shell、Korn Shell等优点。 语法1bash [options] [file] 选项1234-c string:命令从-c后的字符串读取。-i:实现脚本交互。-n:进行shell脚本的语法检查。-x:实现shell脚本逐条语句的跟踪。 实例使用-x选项跟踪脚本调试shell脚本,能打印出所执行的每一行命令以及当前状态: 1234567891011121314151617181920212223242526272829[root@AY1307311912260196fcZ satools]# sh -x check_ssh_login.sh+ DEFINE=30+ cat /var/log/secure+ awk '...

2020-09-26
plot_solarizedlight2
Solarized Light样式表这显示了一个“Solarized_Light”样式的示例,它试图复制以下样式: http://ethanschoonover.com/solarized https://github.com/jrnold/ggthemes http://pygal.org/en/stable/documentation/builtin_styles.html#light-solarized 并且: 使用调色板的所有8个重音 - 从蓝色开始 进行: 为条形图和堆积图创建Alpha值。 .33或.5 应用布局规则 123456789101112131415161718import matplotlib.pyplot as pltimport numpy as npx = np.linspace(0, 10)with plt.style.context('Solarize_Light2'): plt.plot(x, np.sin(x) + x + np.random.randn(50)) plt.plot(x, np.sin...
2020-10-12
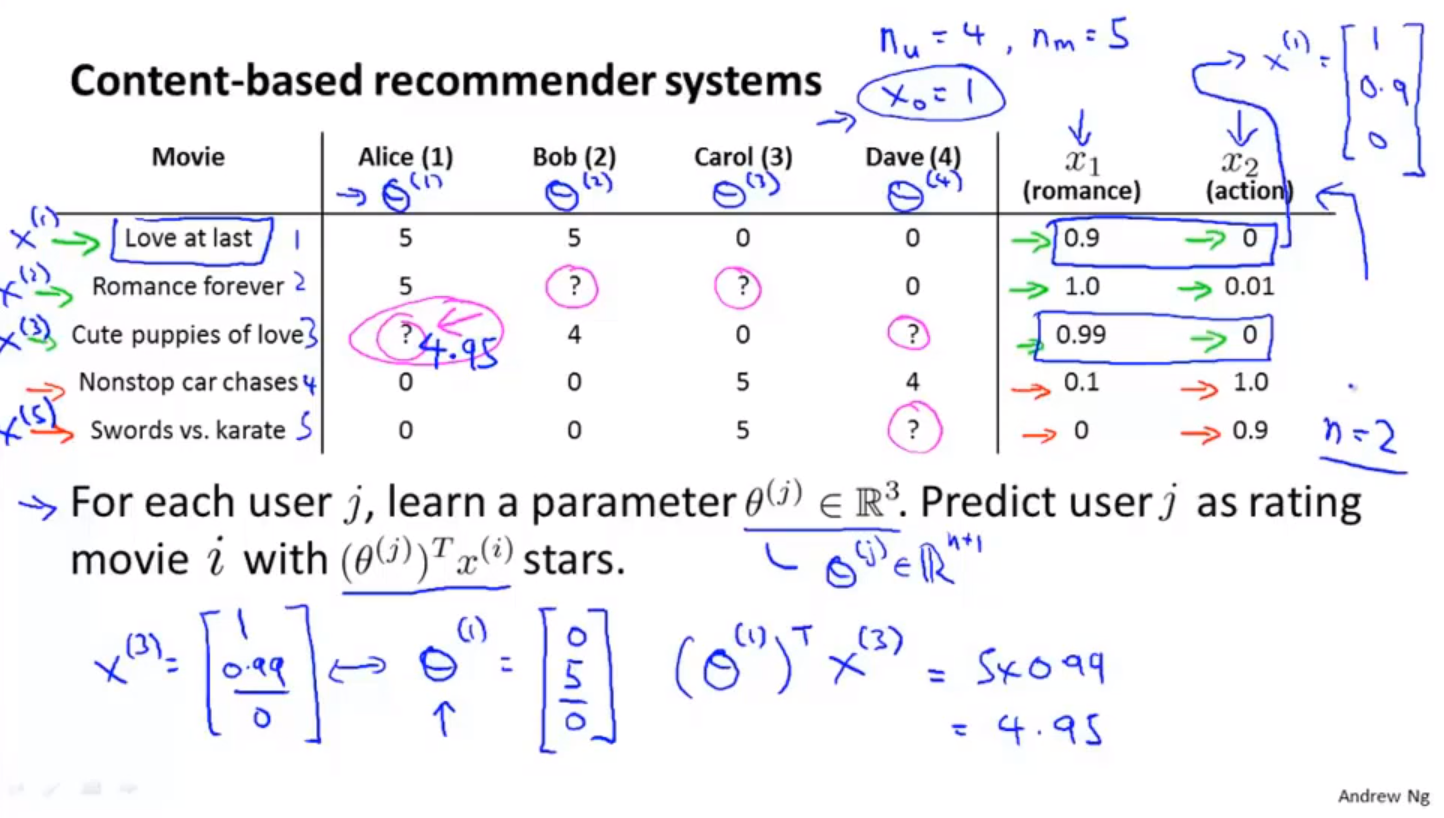
16推荐系统
推荐系统问题规划 电影和用户的评分相关性 使用用户对电影的评分,进行协同过滤的模型。 基于内容的推荐算法 主要思想: 基于用户浏览过的数据集,对用户尚未浏览的数据集进行评分。 假定我们已经知道,单个数据样本的特征标签。 通过多元线性回归+每个用户的历史数据集,训练得到每一个用户的线性回归参数$\theta$ 协同过滤 特征学习,自行学习要使用的特征。 没有考虑用户之间的关联性。首先通过用户对电影特征的喜爱程度,反向 基于浏览过同一个电影的用户数据,对电影进行评分。同样也是基于内容的。前者是基于用户浏览记录+电影特征判断用户对特征的的爱好,后者是通过电影被浏览的记录判断电影包含的特征。 123456789101112用户电影特征基于内容的推荐算法:用户-电影 + 电影-特征 = 用户-特征协同过滤: 用户-电影 + 用户-特征 = 电影-特征两者可以结合,进行循环训练,能够收敛到更好的模型。用户-特征 -> 电影-特征 -> 用户-特征 基于内容的推荐算法:已知用户-电影,电影-特征,求解用户-特征,用户-电影。 协同过滤:已知用户-电影,用户-特征,...
2020-09-23
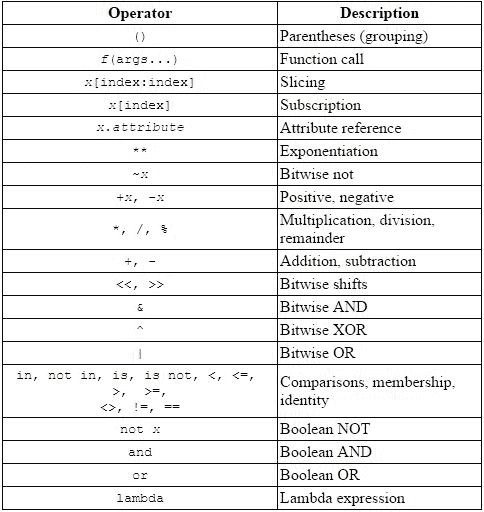
2.1数字和运算
Python 数字 原文: https://thepythonguru.com/python-numbers/ 于 2020 年 5 月 7 日更新 此数据类型仅支持诸如1,31.4,-1000,0.000023和88888888之类的数值。 Python 支持 3 种不同的数字类型。 int-用于整数值,例如1,100,2255,-999999,0和12345678。 float-用于像2.3,3.14,2.71,-11.0之类的浮点值。 complex-适用于3+2j,-2+2.3j,10j,4.5+3.14j等复数。 整数 python 中的整数字面值属于int类。 1234>>> i = 100>>> i100 浮点数 浮点数是带有小数点的值。 1234>>> f = 12.3>>> f12.3 需要注意的一点是,当数字运算符的操作数之一是浮点值时,结果将是浮点值。 123>>> 3 * 1.54.5 复数 如您所知,复数由实部和虚部两部分组成,用j表示。 您可以这样...


