
11-组件化开发
1 |
|
1 | <div id="app"> |
1 | <div id="app"> |
1 | const app = new Vue({ |
1 | components:{//局部组件创建 |
1 | <div id="app"> |
1 | <div id="app"> |
1 | <!-- 1.script标签注意类型是text/x-template --> |
1 | <!-- 2.template标签 --> |
1 | <script src="../js/vue.js"></script> |
1 | <div id="app"> |
1 | <div id="app"> |
1 | const cpn = { |
1 | <div id="app"> |
1 | props: ['cmovies', 'cmessage'] |
1 | props: { |
1 | //1.类型限制(多个类使用数组) |
1 | // 2.提供一些默认值,以及必传值 |
1 | cmessage: { |
1 | //类型是Object/Array,默认值必须是一个函数 |
1 | vaildator: function (value) { |
1 | function Person(firstName,lastName) { |
1 | <div id="app"> |
1 | <div id="app"> |
1 | <!-- 父组件 --> |
1 | methods: { |
1 | <div> |
1 | methods: { |
1 | <cpn @itemclick="cpnClcik"></cpn> |
1 |
|
1 |
|
1 | <!-- 父组件 --> |
1 | // 1.children |
1 | <cpn ref="aaa"></cpn> |
本博客所有文章除特别声明外,均采用 CC BY-NC-SA 4.0 许可协议。转载请注明来源 Estom的博客!
相关推荐

2021-03-09
2 创建型设计模式
Creational Patterns(创建型模式)1 概述目标创建型模式(Creational Patterns)抽象了对象实例化过程。 用于 创建、组合和表示 一个系统的所有对象。 一个类创建型模式使用继承改变被实例化的类。 一个对象创建型模式将实例化委托给另一个对象。 随着系统演化得越来越依赖于对象复合而不是类的继承,创建型模式变得更为重要。 在这些模式中,有两个不断出现的主旋律: 它们都将关于该系统使用那些具体的类的信息封装起来。 它们隐藏了这些类的实例是如何被创建和放在一起的。 因此,创建型模式在什么被创建,谁创建它,它是怎样被创建的,以及何时创建这些方面给予你很大的灵活性。 Consequently, the creational patterns give you a lot of flexibility in what gets created, who creates it, how it gets created, and when. 2 具体方法Factory Method (工厂方法) Define an interface for creat...

2020-09-26
line_with_text
艺术家中的艺术家重写基本方法,以便一个艺术家对象可以包含另一个艺术家对象。在这种情况下,该行包含一个文本实例来为其添加标签。 1234567891011121314151617181920212223242526272829303132333435363738394041424344454647484950515253545556import numpy as npimport matplotlib.pyplot as pltimport matplotlib.lines as linesimport matplotlib.transforms as mtransformsimport matplotlib.text as mtextclass MyLine(lines.Line2D): def __init__(self, *args, **kwargs): # we'll update the position when the line data is set self.text = mtext.Text(0, 0, '...

2021-03-09
logging模块
logging 模块在代码中使用 print() 打印输出是临时性的调试用途的方案。如果希望在线上记录应用日志或者错误日志等, 可以使用 Python 自带的日志模块 logging。常用的日志记录类型有两种, 一种是写到文件里面, 另外一种是终端输出。日志文件存储下来是为了未来回溯的方便, 终端输出是以便于实时查看。logging 模块自带了 6 种级别的日志类型。级别如下(变量值越高说明级别越高): 日志级别变量值 CRITICAL50 ERROR40 WARNING30 INFO20 DEBUG10 NOTSET0 In: import logging In: logging.warning(‘Watch out!’)Out: WARNING:root:Watch out! In: logging.debug(“This message won’t be printed”) 无输出In: logging.basicConfig(level=logging.WARNING) # 使用 basicConfig() 指定默认的日志级别 getLogger() 自定义 l...

2020-07-08
07 数据访问-3MyBatis
对象关系映射模型Hibernate。用来实现非常轻量级的对象的封装。将对象与数据库建立映射关系。实现增删查改。MyBatis与Hibernate非常相似。对象关系映射模型ORG。java对象与关系数据库映射的模型。 1 配置MyBatis最佳实践最佳实战:● 引入mybatis-starter● 配置application.yaml中,指定mapper-location位置即可● 编写Mapper接口并标注@Mapper注解● 简单方法直接注解方式● 复杂方法编写mapper.xml进行绑定映射● @MapperScan(“com.atguigu.admin.mapper”) 简化,其他的接口就可以不用标注@Mapper注解 添加MyBatis依赖12345678910<dependency> <groupId>org.mybatis.spring.boot</groupId> <artifactId>mybatis-spring-boot-starter</artifactId> <vers...
2021-04-08
4.4 迭代器
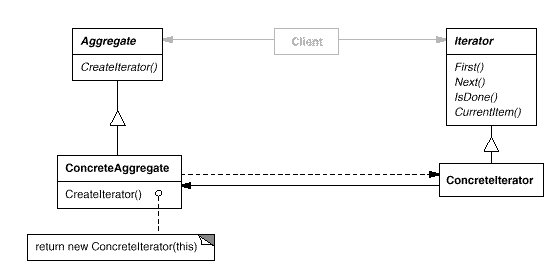
迭代器概念意图提供一种方法顺序访问一个聚合对象中各个元素,而又不需暴露该对象的内部表示。 结构 参与者Iterator 迭代器定义访问和遍历元素的接口。 ConcreteIterator 具体迭代器实现迭代器接口。 对该聚合遍历时跟踪当前位置。 Aggregate 聚合定义创建相应迭代器对象的接口。 ConcreteAggregate 具体聚合实现创建相应迭代器的接口,该操作返回 ConreteIterator 的实例。 适用性在以下情况下可以使用 Iterator 模式: 访问一个聚合对象的内容而无需暴露它的内部表示。 支持对聚合对象的多种遍历。 为遍历不同的聚合结构提供一个统一的接口。 效果 它支持以不同的方式遍历一个聚合。 迭代器简化了聚合的接口。 在同一个聚合上可以有多个遍历。 相关模式 Iterator 常被应用到 Composite 这样的递归结构上。 可以使用 Factory Method 模式来实例化多态迭代器。 Iterator 可以使用 Memento 来捕获一个迭代的状态,在内部存储 Memento。 Imple...
2021-04-08
4.7 观察者
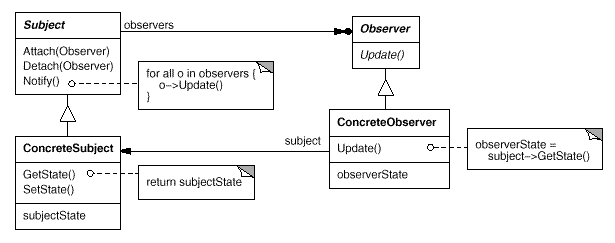
观察者模式别名 Dependency Publish-Subscribe 观察者模式好牛啊,在不同的代码层次有这不同的名称但是大同小异。 在java代码层就是观察着模式 在socket网络编程、IO编程中(netty、springWebFlux、sofarpc)就是Reactor模式 在操作系统中就是IO多路复用的一种策略 在UI框架中就是Listener,事件监听机制和响应机制 在Spring框架中也有事件监听模型。 在web网站开发中,被称为响应式编程。服务发现机制。以下并不是观察者模式的范畴,是一种更加宏观的机制,可能使用了观察者模式去发现。 javaSPI。服务提供者接口 在微服务中就是注册中心的发布订阅过程。发布者订阅者、提供者消费者。 在消息中间件中就是发布订阅模式。https://juejin.cn/post/6993999863159455752 意图 定义对象间的一种一对多的依赖关系,当一个对象的状态发生改变时,所有依赖于它的对象都得到通知并被自动更新。 结构 参与者 Subject Subject 知道它的 Observer。可以有任意多个 O...


