
19-Vuex
1 | 传参的方法对于多层嵌套的组件将会非常繁琐,并且对于兄弟组件间的状态传递无能为力 |
1 | 采用父子组件直接引用或者通过事件来变更和同步状态的多份拷贝,通常会导致无法维护的代码 |
1 | // 创建一个 Counter 组件 |
1 | const app = new Vue({ |
1 | const Counter = { |
1 | // 在单独构建的版本中辅助函数为 Vuex.mapState |
1 | computed: mapState([ |
1 | computed: { |
1 | const store = new Vuex.Store({ |
1 | store.getters.doneTodos // -> [{ id: 1, text: '...', done: true }] |
1 | getters: { |
1 | computed: { |
1 | getters: { |
1 | import { mapGetters } from 'vuex' |
1 | mapGetters({ |
1 | const store = new Vuex.Store({ |
1 | // ... |
1 | store.commit('increment', 10) |
1 | ... |
1 | // 以载荷形式分发 |
1 | // 以对象形式分发 |
1 | mutations: { |
1 | // mutation-types.js |
1 | export default { |
1 | // store.js |
1 | ... |
1 | import MutationType from './mutation-type' |
1 | mutations: { |
1 | this.$store.commit('increment','参数') |
1 | import { mapMutations } from 'vuex' |
1 | const store = new Vuex.Store({ |
1 | actions: { |
1 | store.dispatch('increment') |
1 | actions: { |
1 | // 以载荷形式分发 |
1 | actions: { |
1 | import { mapActions } from 'vuex' |
1 | actions: { |
1 | store.dispatch('actionA').then(() => { |
1 | actions: { |
1 | // 假设 getData() 和 getOtherData() 返回的是 Promise |
1 | const moduleA = { |
1 | const moduleA = { |
1 | const moduleA = { |
1 | const moduleA = { |
1 | const store = new Vuex.Store({ |
1 | /** |
1 | /** |
1 | /** |
1 | import * as types from "./mutations-types" |
1 | import Vue from 'vue' |
1 | import Vue from 'vue' |
1 | <template> |
1 | <div id="example"> |
1 | var vm = new Vue({ |
1 | // src/core/instance/state.js |
1 | // src/core/instance/state.js |
1 | // src/core/observer/index.js |
1 | // src/core/observer/index.js |
1 | // src/core/observer/dep.js |
1 | // src/core/instance/state.js |
1 | // src/core/observer/watcher.js |
1 | this.dirty = this.lazy this.getter = expOrFn |
1 | // src/core/instance/state.js |
1 | // src/core/instance/state.js |
1 | get: function reactiveGetter () { |
1 | var vm = new Vue({ |
1 | // src/store.js |
1 | // src/mixins.js |
1 | const store = new Vuex.Store({ |
1 | // src/store.js |
1 | // src/store.js |
本博客所有文章除特别声明外,均采用 CC BY-NC-SA 4.0 许可协议。转载请注明来源 Estom的博客!
相关推荐
2021-04-10
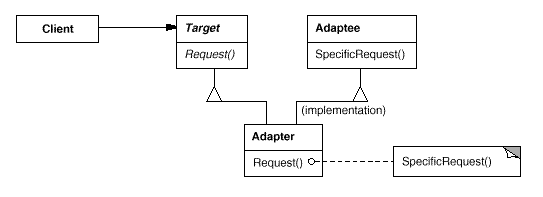
3.1 适配器
适配器模式别名 包装器(Wrapper) 意图 将一个类的接口转换成客户希望的另外一个接口。 Adapter 模式使得原本由于接口不兼容而不能一起工作的那些类可以一起工作。结构 类适配器使用多重继承对一个接口与另一个接口进行匹配。 对象适配器依赖于对象组合。 参与者 Target 定义 Client 使用的与特定领域相关的接口。 Client 与符合 Target 接口的对象协同。 Adaptee 定义一个已经存在的接口,这个接口需要适配。 Adapter 对 Adaptee 的接口与 Target 接口进行适配。 适用性 在以下情况下可以使用 Adapter 模式: 你想使用一个已经存在的类,而它的接口不符合你的需求。 你想创建一个可以复用的类,该类可以与其他不相关的类或不可预见的类协同工作。 你想使用一些已经存在的类,但是不可能对每一个都进行子类化匹配它们的接口。对象适配器可以适配它的父类的接口。 效果 允许一个 Adapter 与多个 Adaptee (Adaptee 本身及它的子类)同时协同。Adapter也可以一次给所有的 Adapt...

2020-09-26
custom_legends
撰写自定义图例Composing custom legends piece-by-piece. 注意: For more information on creating and customizing legends, see the following pages: Legend guide Legend Demo 有时您不希望与已绘制的数据明确关联的图例。例如,假设您已绘制了10行,但不希望每个行都显示图例项。如果您只是绘制线条并调用ax.legend(),您将获得以下内容: 1234567891011121314151617# sphinx_gallery_thumbnail_number = 2from matplotlib import rcParams, cyclerimport matplotlib.pyplot as pltimport numpy as np# Fixing random state for reproducibilitynp.random.seed(19680801)N = 10data = [np.logspace(0, 1, 100) ...

2022-11-24
mockito
官网http://mockito.org/API http://docs.mockito.googlecode.com/hg/org/mockito/Mockito.html抄笔记,https://www.letianbiji.com/java-mockito/mockito-test-isolate.html 基本概念单元测试UT工作一段时间后,才真正意识到代码质量的重要性。虽然囫囵吞枣式地开发,表面上看来速度很快,但是给后续的维护与拓展制造了很多隐患。作为一个想专业但还不专业的程序员,通过构建覆盖率比较高的单元测试用例,可以比较显著地提高代码质量。如后续需求变更、版本迭代时,重新跑一次单元测试即可校验自己的改动是否正确。 是什么Mockito是mocking框架,它让你用简洁的API做测试。而且Mockito简单易学,它可读性强和验证语法简洁。 Stub和Mock异同相同:Stub和Mock都是模拟外部依赖不同:Stub是完全模拟一个外部依赖, 而Mock还可以用来判断测试通过还是失败 与Junit框架一同使用请MockitoAnnotations.initMocks(...
2021-04-21
22 new&delete
C++中的new、operator new与placement new 参考文献 https://www.cnblogs.com/luxiaoxun/archive/2012/08/10/2631812.html https://blog.csdn.net/linuxheik/article/details/80449059 new operator/delete operator就是new和delete操作符。而operator new/operator delete是全局函数。 1 C++中的new/deletenew operator就是new操作符,不能被重载,假如A是一个类,那么A * a=new A;实际上执行如下3个过程。 调用operator new分配内存,operator new (sizeof(A)) 调用构造函数生成类对象,A::A() 返回相应指针 2 operator new/operator delete三种形式operator new是函数,分为三种形式(前2种不调用构造函...

2019-11-30
9 字符串
字符串1 简介在 Scala 中,字符串的类型实际上是 Java String,它本身没有 String 类。 在 Scala 中,String 是一个不可变的对象,所以该对象不可被修改。这就意味着你如果修改字符串就会产生一个新的字符串对象。 但其他对象,如数组就是可变的对象。接下来我们会为大家介绍常用的 java.lang.String 方法。 2 常用方法创建字符串创建字符串实例如下: var greeting = “Hello World!”; 或 var greeting:String = “Hello World!”; 字符串长度我们可以使用 length() 方法来获取字符串长度: object Test { def main(args: Array[String]) { var palindrome = “www.runoob.com“; var len = palindrome.length(); println( “String Length is : “ + len ); }} 字符...

2020-09-26
index
事件处理Matplotlib支持使用GUI中立事件模型进行事件处理,因此您可以连接到Matplotlib事件,而无需了解Matplotlib最终将插入哪个用户界面。 这有两个好处:你编写的代码将更加可移植,Matplotlib事件就像数据坐标空间和事件发生在哪些轴之类的东西,所以你不必混淆低级转换细节来自画布空间到数据空间。还包括对象拾取示例。


