1 J.U.C - AQS java.util.concurrent(J.U.C)大大提高了并发性能,AQS 被认为是 J.U.C 的核心。
ReentrantLock:lock/unlock ReentrantLock 是 java.util.concurrent(J.U.C)包中的锁。
1
2
3
4
5
6
7
8
9
10
11
12
13
14
15
public class LockExample { private Lock lock = new ReentrantLock (); public void func () { lock.lock(); try { for (int i = 0 ; i < 10 ; i++) { System.out.print(i + " " ); } } finally { lock.unlock(); } } }
1
2
3
4
5
6
public static void main (String[] args) { LockExample lockExample = new LockExample (); ExecutorService executorService = Executors.newCachedThreadPool(); executorService.execute(() -> lockExample.func()); executorService.execute(() -> lockExample.func()); }
1 0 1 2 3 4 5 6 7 8 9 0 1 2 3 4 5 6 7 8 9
比较 除非需要使用 ReentrantLock 的高级功能,否则优先使用 synchronized。这是因为 synchronized 是 JVM 实现的一种锁机制,JVM 原生地支持它,而 ReentrantLock 不是所有的 JDK 版本都支持。并且使用 synchronized 不用担心没有释放锁而导致死锁问题,因为 JVM 会确保锁的释放。
1. 锁的实现
synchronized 是 JVM 实现的,而 ReentrantLock 是 JDK 实现的。
2. 性能
新版本 Java 对 synchronized 进行了很多优化,例如自旋锁等,synchronized 与 ReentrantLock 大致相同。
3. 等待可中断
当持有锁的线程长期不释放锁的时候,正在等待的线程可以选择放弃等待,改为处理其他事情。
ReentrantLock 可中断,而 synchronized 不行。
4. 公平锁
公平锁是指多个线程在等待同一个锁时,必须按照申请锁的时间顺序来依次获得锁。
synchronized 中的锁是非公平的,ReentrantLock 默认情况下也是非公平的,但是也可以是公平的。
5. 锁绑定多个条件
一个 ReentrantLock 可以同时绑定多个 Condition 对象。
Condition:await、signal、signalAll java.util.concurrent 类库中提供了 Condition 类来实现线程之间的协调,可以在 Condition 上调用 await() 方法使线程等待,其它线程调用 signal() 或 signalAll() 方法唤醒等待的线程。
相比于 wait() 这种等待方式,await() 可以指定等待的条件,因此更加灵活。
使用 Lock 来获取一个 Condition 对象。
1
2
3
4
5
6
7
8
9
10
11
12
13
14
15
16
17
18
19
20
21
22
23
24
25
26
27
public class AwaitSignalExample { private Lock lock = new ReentrantLock (); private Condition condition = lock.newCondition(); public void before () { lock.lock(); try { System.out.println("before" ); condition.signalAll(); } finally { lock.unlock(); } } public void after () { lock.lock(); try { condition.await(); System.out.println("after" ); } catch (InterruptedException e) { e.printStackTrace(); } finally { lock.unlock(); } } }
1
2
3
4
5
6
public static void main (String[] args) { ExecutorService executorService = Executors.newCachedThreadPool(); AwaitSignalExample example = new AwaitSignalExample (); executorService.execute(() -> example.after()); executorService.execute(() -> example.before()); }
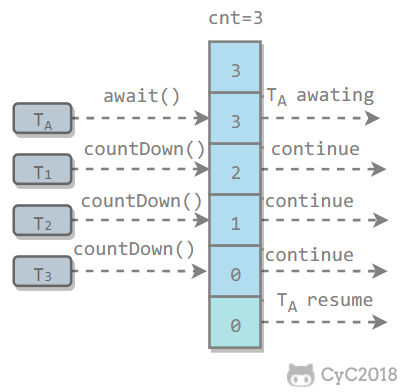
CountDownLatch 用来控制一个或者多个线程等待多个线程。
维护了一个计数器 cnt,每次调用 countDown() 方法会让计数器的值减 1,减到 0 的时候,那些因为调用 await() 方法而在等待的线程就会被唤醒。
1
2
3
4
5
6
7
8
9
10
11
12
13
14
15
16
17
public class CountdownLatchExample { public static void main (String[] args) throws InterruptedException { final int totalThread = 10 ; CountDownLatch countDownLatch = new CountDownLatch (totalThread); ExecutorService executorService = Executors.newCachedThreadPool(); for (int i = 0 ; i < totalThread; i++) { executorService.execute(() -> { System.out.print("run.." ); countDownLatch.countDown(); }); } countDownLatch.await(); System.out.println("end" ); executorService.shutdown(); } }
1 run..run..run..run..run..run..run..run..run..run..end
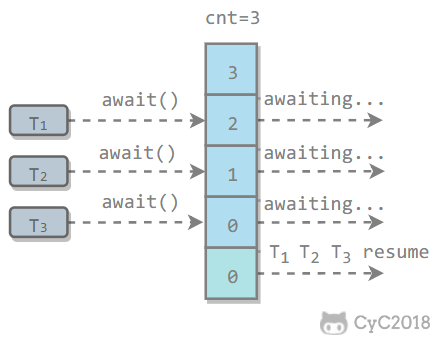
CyclicBarrier 用来控制多个线程互相等待,只有当多个线程都到达时,这些线程才会继续执行。
和 CountdownLatch 相似,都是通过维护计数器来实现的。线程执行 await() 方法之后计数器会减 1,并进行等待,直到计数器为 0,所有调用 await() 方法而在等待的线程才能继续执行。
CyclicBarrier 和 CountdownLatch 的一个区别是,CyclicBarrier 的计数器通过调用 reset() 方法可以循环使用,所以它才叫做循环屏障。
CyclicBarrier 有两个构造函数,其中 parties 指示计数器的初始值,barrierAction 在所有线程都到达屏障的时候会执行一次。
1
2
3
4
5
6
7
8
9
10
public CyclicBarrier (int parties, Runnable barrierAction) { if (parties <= 0 ) throw new IllegalArgumentException (); this .parties = parties; this .count = parties; this .barrierCommand = barrierAction; } public CyclicBarrier (int parties) { this (parties, null ); }
1
2
3
4
5
6
7
8
9
10
11
12
13
14
15
16
17
18
19
20
public class CyclicBarrierExample { public static void main (String[] args) { final int totalThread = 10 ; CyclicBarrier cyclicBarrier = new CyclicBarrier (totalThread); ExecutorService executorService = Executors.newCachedThreadPool(); for (int i = 0 ; i < totalThread; i++) { executorService.execute(() -> { System.out.print("before.." ); try { cyclicBarrier.await(); } catch (InterruptedException | BrokenBarrierException e) { e.printStackTrace(); } System.out.print("after.." ); }); } executorService.shutdown(); } }
1 before..before..before..before..before..before..before..before..before..before..after..after..after..after..after..after..after..after..after..after..
Semaphore Semaphore 类似于操作系统中的信号量,可以控制对互斥资源的访问线程数。
以下代码模拟了对某个服务的并发请求,每次只能有 3 个客户端同时访问,请求总数为 10。
1
2
3
4
5
6
7
8
9
10
11
12
13
14
15
16
17
18
19
20
21
22
public class SemaphoreExample { public static void main (String[] args) { final int clientCount = 3 ; final int totalRequestCount = 10 ; Semaphore semaphore = new Semaphore (clientCount); ExecutorService executorService = Executors.newCachedThreadPool(); for (int i = 0 ; i < totalRequestCount; i++) { executorService.execute(()->{ try { semaphore.acquire(); System.out.print(semaphore.availablePermits() + " " ); } catch (InterruptedException e) { e.printStackTrace(); } finally { semaphore.release(); } }); } executorService.shutdown(); } }
FutureTask 在介绍 Callable 时我们知道它可以有返回值,返回值通过 Future<V> 进行封装。FutureTask 实现了 RunnableFuture 接口,该接口继承自 Runnable 和 Future<V> 接口,这使得 FutureTask 既可以当做一个任务执行,也可以有返回值。
1 public class FutureTask <V> implements RunnableFuture <V>
1 public interface RunnableFuture <V> extends Runnable , Future<V>
FutureTask 可用于异步获取执行结果或取消执行任务的场景。当一个计算任务需要执行很长时间,那么就可以用 FutureTask 来封装这个任务,主线程在完成自己的任务之后再去获取结果。
1
2
3
4
5
6
7
8
9
10
11
12
13
14
15
16
17
18
19
20
21
22
23
24
25
26
27
28
29
30
public class FutureTaskExample { public static void main (String[] args) throws ExecutionException, InterruptedException { FutureTask<Integer> futureTask = new FutureTask <Integer>(new Callable <Integer>() { @Override public Integer call () throws Exception { int result = 0 ; for (int i = 0 ; i < 100 ; i++) { Thread.sleep(10 ); result += i; } return result; } }); Thread computeThread = new Thread (futureTask); computeThread.start(); Thread otherThread = new Thread (() -> { System.out.println("other task is running..." ); try { Thread.sleep(1000 ); } catch (InterruptedException e) { e.printStackTrace(); } }); otherThread.start(); System.out.println(futureTask.get()); } }
1
2
other task is running... 4950
2 J.U.C -并发容器 并发集合是指使用了最新并发能力的集合,在JUC包下。而同步集合指之前用同步锁实现的集合
CopyOnWriteArrayList CopyOnWriteArrayList在写的时候会复制一个副本,对副本写,写完用副本替换原值,读的时候不需要同步,适用于写少读多的场合。
CopyOnWriteArraySet基于CopyOnWriteArrayList来实现的,只是在不允许存在重复的对象这个特性上遍历处理了一下。
读写分离 写操作在一个复制的数组上进行,读操作还是在原始数组中进行,读写分离,互不影响。
写操作需要加锁,防止并发写入时导致写入数据丢失。
写操作结束之后需要把原始数组指向新的复制数组。
1
2
3
4
5
6
7
8
9
10
11
12
13
14
15
16
17
18
public boolean add (E e) { final ReentrantLock lock = this .lock; lock.lock(); try { Object[] elements = getArray(); int len = elements.length; Object[] newElements = Arrays.copyOf(elements, len + 1 ); newElements[len] = e; setArray(newElements); return true ; } finally { lock.unlock(); } } final void setArray (Object[] a) { array = a; }
1
2
3
4
@SuppressWarnings("unchecked") private E get (Object[] a, int index) { return (E) a[index]; }
适用场景 CopyOnWriteArrayList 在写操作的同时允许读操作,大大提高了读操作的性能,因此很适合读多写少的应用场景。
但是 CopyOnWriteArrayList 有其缺陷:
内存占用:在写操作时需要复制一个新的数组,使得内存占用为原来的两倍左右;
数据不一致:读操作不能读取实时性的数据,因为部分写操作的数据还未同步到读数组中。
所以 CopyOnWriteArrayList 不适合内存敏感以及对实时性要求很高的场景。
用来替代vector,提供现成安全的list
底层原理 Java CopyOnWriteArrayList是ArrayList的thread-safe变体,其中所有可变操作(添加,设置等)都通过对基础array进行全新复制来实现。
CopyOnWriteArrayList类实现List和RandomAccess接口,因此提供ArrayList类中可用的所有功能。
使用CopyOnWriteArrayList进行更新操作的成本很高,因为每个突变都会创建基础数组的克隆副本,并为其添加/更新元素。
它是ArrayList的线程安全版本。 每个访问列表的线程在初始化此列表的迭代器时都会看到自己创建的后备阵列快照版本。
因为它在创建迭代器时获取基础数组的快照,所以它不会抛出ConcurrentModificationException 。
不支持对迭代器的删除操作(删除,设置和添加)。 这些方法抛出UnsupportedOperationException 。
CopyOnWriteArrayList是synchronized List的并发替代,当迭代的次数超过突变次数时,CopyOnWriteArrayList可以提供更好的并发性。
它允许重复的元素和异构对象(使用泛型来获取编译时错误)。因为它每次创建迭代器时都会创建一个新的数组副本,所以performance is slower比ArrayList performance is slower 。
实例 1 2 3 4 5 6 7 8 9 10 11 12 13 14 15 16 17 18 19 20 21 22 CopyOnWriteArrayList<Integer> list = new CopyOnWriteArrayList <>(new Integer [] {1 ,2 ,3 }); System.out.println(list); Iterator<Integer> itr1 = list.iterator(); list.add(4 ); System.out.println(list); Iterator<Integer> itr2 = list.iterator(); System.out.println("====Verify Iterator 1 content====" ); itr1.forEachRemaining(System.out :: println); System.out.println("====Verify Iterator 2 content====" ); itr2.forEachRemaining(System.out :: println);
主要方法 1 2 3 4 5 CopyOnWriteArrayList() :创建一个空列表。 CopyOnWriteArrayList(Collection c) :创建一个列表,该列表包含指定集合的元素,并按集合的迭代器返回它们的顺序。 CopyOnWriteArrayList(object[] array) :创建一个保存给定数组副本的列表。 boolean addIfAbsent (object o) :如果不存在则追加元素。int addAllAbsent (Collection c) :以指定集合的迭代器返回的顺序,将指定集合中尚未包含在此列表中的所有元素追加到此列表的末尾。
BlockingQueue 在并发队列上JDK提供了两套实现,
一个是以ConcurrentLinkedQueue为代表的高性能队列
一个是以BlockingQueue接口为代表的阻塞队列。
ConcurrentLinkedQueue适用于高并发场景下的队列,通过无锁的方式实现,通常ConcurrentLinkedQueue的性能要优于BlockingQueue。BlockingQueue的典型应用场景是生产者-消费者模式中,如果生产快于消费,生产队列装满时会阻塞,等待消费。
java.util.concurrent.BlockingQueue 接口有以下阻塞队列的实现:
FIFO 队列 :LinkedBlockingQueue、ArrayBlockingQueue(固定长度)优先级队列 :PriorityBlockingQueue
提供了阻塞的 take() 和 put() 方法:如果队列为空 take() 将阻塞,直到队列中有内容;如果队列为满 put() 将阻塞,直到队列有空闲位置。
使用 BlockingQueue 实现生产者消费者问题
1 2 3 4 5 6 7 8 9 10 11 12 13 14 15 16 17 18 19 20 21 22 23 24 25 26 27 28 29 public class ProducerConsumer { private static BlockingQueue<String> queue = new ArrayBlockingQueue <>(5 ); private static class Producer extends Thread { @Override public void run () { try { queue.put("product" ); } catch (InterruptedException e) { e.printStackTrace(); } System.out.print("produce.." ); } } private static class Consumer extends Thread { @Override public void run () { try { String product = queue.take(); } catch (InterruptedException e) { e.printStackTrace(); } System.out.print("consume.." ); } } }
1 2 3 4 5 6 7 8 9 10 11 12 13 14 public static void main (String[] args) { for (int i = 0 ; i < 2 ; i++) { Producer producer = new Producer (); producer.start(); } for (int i = 0 ; i < 5 ; i++) { Consumer consumer = new Consumer (); consumer.start(); } for (int i = 0 ; i < 3 ; i++) { Producer producer = new Producer (); producer.start(); } }
1 produce..produce..consume..consume..produce..consume..produce..consume..produce..consume..
4 PriorityBlockingQueue 底层原理 Java PriorityBlockingQueue类是concurrent阻塞队列数据结构的实现,其中根据对象的priority对其进行处理。 名称的“阻塞”部分已添加,表示线程将阻塞等待,直到队列上有可用的项目为止 。
在priority blocking queue ,添加的对象根据其优先级进行排序。 默认情况下,优先级由对象的自然顺序决定。 队列构建时提供的Comparator器可以覆盖默认优先级。
PriorityBlockingQueue是一个无界队列,并且会动态增长。 默认初始容量为’11’ ,可以在适当的构造函数中使用initialCapacity参数覆盖此初始容量。
它提供了阻塞检索操作 。
它不允许使用NULL对象。
添加到PriorityBlockingQueue的对象必须具有可比性,否则它将引发ClassCastException 。
默认情况下,优先级队列的对象以自然顺序排序 。
比较器可用于队列中对象的自定义排序。
优先级队列的head是基于自然排序或基于比较器排序的least元素。 当我们轮询队列时,它从队列中返回头对象。
如果存在多个具有相同优先级的对象,则它可以随机轮询其中的任何一个。
PriorityBlockingQueue是thread safe 。
主要方法 1 2 3 4 5 6 7 8 9 10 11 12 13 14 15 16 boolean add (object) :将指定的元素插入此优先级队列。boolean offer (object) :将指定的元素插入此优先级队列。boolean remove (object) :从此队列中移除指定元素的单个实例(如果存在)。Object poll () :检索并删除此队列的头部,并在必要时等待指定的等待时间,以使元素可用。 Object poll (timeout, timeUnit) :检索并删除此队列的头部,如果有必要,直到指定的等待时间,元素才可用。 Object take () :检索并删除此队列的头部,如有必要,请等待直到元素可用。 void put (Object o) :将指定的元素插入此优先级队列。void clear () :从此优先级队列中删除所有元素。Comparator comparator () :返回用于对此队列中的元素进行排序的Comparator comparator () 如果此队列是根据其元素的自然顺序排序的,则返回null 。 boolean contains (Object o) :如果此队列包含指定的元素,则返回true 。Iterator iterator () :返回对该队列中的元素进行迭代的迭代器。 int size () :返回此队列中的元素数。int drainTo (Collection c) :从此队列中删除所有可用元素,并将它们添加到给定的collection中。intrainToTo(Collection c,int maxElements) :从此队列中最多移除给定数量的可用元素,并将它们添加到给定的collection中。 int remainingCapacity () Integer.MAX_VALUE int remainingCapacity () :总是返回Integer.MAX_VALUE因为PriorityBlockingQueue不受容量限制。Object[] toArray() :返回一个包含此队列中所有元素的数组。
实例 1 2 3 4 5 6 7 8 9 10 11 12 13 14 15 16 17 18 19 20 21 22 23 24 25 26 27 28 29 30 31 32 33 34 35 36 37 38 39 import java.util.concurrent.PriorityBlockingQueue;import java.util.concurrent.TimeUnit; public class PriorityQueueExample { public static void main (String[] args) throws InterruptedException { PriorityBlockingQueue<Integer> priorityBlockingQueue = new PriorityBlockingQueue <>(); new Thread (() -> { System.out.println("Waiting to poll ..." ); try { while (true ) { Integer poll = priorityBlockingQueue.take(); System.out.println("Polled : " + poll); Thread.sleep(TimeUnit.SECONDS.toMillis(1 )); } } catch (InterruptedException e) { e.printStackTrace(); } }).start(); Thread.sleep(TimeUnit.SECONDS.toMillis(2 )); priorityBlockingQueue.add(1 ); Thread.sleep(TimeUnit.SECONDS.toMillis(2 )); priorityBlockingQueue.add(2 ); Thread.sleep(TimeUnit.SECONDS.toMillis(2 )); priorityBlockingQueue.add(3 ); } }
5 ArrayBlockingQueue 底层原理 ArrayBlockingQueue类是由数组支持的Java concurrent和bounded阻塞队列实现。 它对元素FIFO(先进先出)进行排序。
ArrayBlockingQueue的head是一直在队列中最长时间的那个元素。 ArrayBlockingQueue的tail是最短时间进入队列的元素。 新元素插入到队列的尾部 ,并且队列检索操作在队列的开头获取元素 。
ArrayBlockingQueue是由数组支持的固定大小的有界队列。
它对元素FIFO(先进先出)进行排序。
元素插入到尾部,并从队列的开头检索。
创建后,队列的容量无法更改。
它提供阻塞的插入和检索操作 。
它不允许使用NULL对象。
ArrayBlockingQueue是thread safe 。
方法iterator()提供的Iterator按从第一个(头)到最后一个(尾部)的顺序遍历元素。
ArrayBlockingQueue支持可选的fairness policy用于订购等待的生产者线程和使用者线程。 将fairness设置为true ,队列按FIFO顺序授予线程访问权限。
生产消费者实例 使用阻塞插入和检索从ArrayBlockingQueue中放入和取出元素的Java示例。
当队列已满时,生产者线程将等待。 一旦从队列中取出一个元素,它就会将该元素添加到队列中。
如果队列为空,使用者线程将等待。 队列中只有一个元素时,它将取出该元素。
1 2 3 4 5 6 7 8 9 10 11 12 13 14 15 16 17 18 19 20 21 22 23 24 25 26 27 28 29 30 31 32 33 34 35 36 37 38 39 40 41 42 43 44 45 46 47 48 49 import java.util.concurrent.ArrayBlockingQueue;import java.util.concurrent.TimeUnit; public class ArrayBlockingQueueExample { public static void main (String[] args) throws InterruptedException { ArrayBlockingQueue<Integer> priorityBlockingQueue = new ArrayBlockingQueue <>(5 ); new Thread (() -> { int i = 0 ; try { while (true ) { priorityBlockingQueue.put(++i); System.out.println("Added : " + i); Thread.sleep(TimeUnit.SECONDS.toMillis(1 )); } } catch (InterruptedException e) { e.printStackTrace(); } }).start(); new Thread (() -> { try { while (true ) { Integer poll = priorityBlockingQueue.take(); System.out.println("Polled : " + poll); Thread.sleep(TimeUnit.SECONDS.toMillis(2 )); } } catch (InterruptedException e) { e.printStackTrace(); } }).start(); } }
主要方法 1 2 3 4 5 6 7 8 9 10 11 12 13 14 15 16 17 18 19 ArrayBlockingQueue(int capacity) :构造具有给定(固定)容量和默认访问策略的空队列。 ArrayBlockingQueue(int capacity,boolean fair) :构造具有给定(固定)容量和指定访问策略的空队列。 如果公允值为true ,则按FIFO顺序处理在插入或移除时阻塞的线程的队列访问; 如果为false ,则未指定访问顺序。 ArrayBlockingQueue(int capacity,boolean fair,Collection c) :构造一个队列,该队列具有给定(固定)的容量,指定的访问策略,并最初包含给定集合的元素,并以集合迭代器的遍历顺序添加。 void put (Object o) :将指定的元素插入此队列的尾部,如果队列已满,则等待空间变为可用。boolean add (object) : Inserts the specified element at the tail of this queue if it is possible to do so immediately without exceeding the queue’s capacity, returning true upon success and throwing an IllegalStateException if this queue is full.boolean offer (object) :如果可以在不超出队列容量的情况下立即执行此操作,则在此队列的尾部插入指定的元素,如果成功,则返回true ,如果此队列已满,则抛出IllegalStateException。boolean remove (object) :从此队列中移除指定元素的单个实例(如果存在)。Object peek () :检索但不删除此队列的头部;如果此队列为空,则返回null 。 Object poll () :检索并删除此队列的头部;如果此队列为空,则返回null 。 Object poll (timeout, timeUnit) :检索并删除此队列的头部,如果有必要,直到指定的等待时间,元素才可用。 Object take () :检索并删除此队列的头部,如有必要,请等待直到元素可用。 void clear () :从队列中删除所有元素。boolean contains (Object o) :如果此队列包含指定的元素,则返回true 。Iterator iterator () :以适当的顺序返回对该队列中的元素进行迭代的迭代器。 int size () :返回此队列中的元素数。int drainTo (Collection c) :从此队列中删除所有可用元素,并将它们添加到给定的collection中。intrainToTo(Collection c,int maxElements) :从此队列中最多移除给定数量的可用元素,并将它们添加到给定的collection中。 int remainingCapacity () :返回该队列理想情况下(在没有内存或资源限制的情况下)可以接受而不阻塞的其他元素的数量。Object[] toArray() :以适当的顺序返回一个包含此队列中所有元素的数组。
6 LinkedTransferQueue 底层原理 直接消息队列。也就是说,生产者生产后,必须等待消费者来消费才能继续执行。
Java TransferQueue是并发阻塞队列的实现,生产者可以在其中等待使用者使用消息。 LinkedTransferQueue类是Java中TransferQueue的实现。
LinkedTransferQueue是链接节点上的unbounded队列。
此队列针对任何给定的生产者对元素FIFO(先进先出)进行排序。
元素插入到尾部,并从队列的开头检索。
它提供阻塞的插入和检索操作 。
它不允许使用NULL对象。
LinkedTransferQueue是thread safe 。
由于异步性质,size()方法不是固定时间操作,因此,如果在遍历期间修改此集合,则可能会报告不正确的结果。
不保证批量操作addAll,removeAll,retainAll,containsAll,equals和toArray是原子执行的。 例如,与addAll操作并发操作的迭代器可能仅查看某些添加的元素。
实例 非阻塞实例
1 2 3 4 5 6 7 8 9 LinkedTransferQueue<Integer> linkedTransferQueue = new LinkedTransferQueue <>(); linkedTransferQueue.put(1 ); System.out.println("Added Message = 1" ); Integer message = linkedTransferQueue.poll(); System.out.println("Recieved Message = " + message);
阻塞插入实例,用于现成状态同步通信
生产者线程将等待,直到有消费者准备从队列中取出项目为止。
如果队列为空,使用者线程将等待。 队列中只有一个元素时,它将取出该元素。 只有在消费者接受了消息之后,生产者才可以再发送一条消息。
1 2 3 4 5 6 7 8 9 10 11 12 13 14 15 16 17 18 19 20 21 22 23 24 25 26 27 28 29 30 31 32 33 34 35 36 37 38 39 40 41 42 43 44 45 46 47 48 49 50 51 52 53 54 55 import java.util.Random;import java.util.concurrent.LinkedTransferQueue;import java.util.concurrent.TimeUnit; public class LinkedTransferQueueExample { public static void main (String[] args) throws InterruptedException { LinkedTransferQueue<Integer> linkedTransferQueue = new LinkedTransferQueue <>(); new Thread (() -> { Random random = new Random (1 ); try { while (true ) { System.out.println("Producer is waiting to transfer message..." ); Integer message = random.nextInt(); boolean added = linkedTransferQueue.tryTransfer(message); if (added) { System.out.println("Producer added the message - " + message); } Thread.sleep(TimeUnit.SECONDS.toMillis(3 )); } } catch (InterruptedException e) { e.printStackTrace(); } }).start(); new Thread (() -> { try { while (true ) { System.out.println("Consumer is waiting to take message..." ); Integer message = linkedTransferQueue.take(); System.out.println("Consumer recieved the message - " + message); Thread.sleep(TimeUnit.SECONDS.toMillis(3 )); } } catch (InterruptedException e) { e.printStackTrace(); } }).start(); } }
主要方法 1 2 3 4 5 6 7 8 9 10 11 12 13 14 15 16 17 18 19 20 21 22 23 LinkedTransferQueue() :构造一个初始为空的LinkedTransferQueue。 LinkedTransferQueue(Collection c) :构造一个LinkedTransferQueue,最初包含给定集合的元素,并以该集合的迭代器的遍历顺序添加。 Object take () :检索并删除此队列的头部,如有必要,请等待直到元素可用。 void transfer (Object o) :将元素传输给使用者,如有必要,请等待。boolean tryTransfer (Object o) :如果可能,立即将元素传输到等待的使用者。boolean tryTransfer(Object o,long timeout,TimeUnit unit) :如果有可能,则在超时之前将元素传输给使用者。int getWaitingConsumerCount () :返回等待通过BlockingQueue.take()或定时轮询接收元素的使用者数量的估计值。boolean hasWaitingConsumer () :如果至少有一个使用者正在等待通过BlockingQueue.take()或定时轮询接收元素,则返回true 。void put (Object o) :将指定的元素插入此队列的尾部。boolean add (object) : Inserts the specified element at the tail of this queue.boolean offer (object) :将指定的元素插入此队列的尾部。boolean remove (object) :从此队列中移除指定元素的单个实例(如果存在)。Object peek () :检索但不删除此队列的头部;如果此队列为空,则返回null 。 Object poll () :检索并删除此队列的头部;如果此队列为空,则返回null 。 Object poll (timeout, timeUnit) :检索并删除此队列的头部,如果有必要,直到指定的等待时间,元素才可用。 void clear () :从队列中删除所有元素。boolean contains (Object o) :如果此队列包含指定的元素,则返回true 。Iterator iterator () :以适当的顺序返回对该队列中的元素进行迭代的迭代器。 int size () :返回此队列中的元素数。int drainTo (Collection c) :从此队列中删除所有可用元素,并将它们添加到给定的collection中。intrainToTo(Collection c,int maxElements) :从此队列中最多移除给定数量的可用元素,并将它们添加到给定的collection中。 int remainingCapacity () :返回该队列理想情况下(在没有内存或资源限制的情况下)可以接受而不阻塞的其他元素的数量。Object[] toArray() :以适当的顺序返回一个包含此队列中所有元素的数组。
Concurrent
ConcurrentLinkedQueue
ConcurrentLinkedDeque
ConcurrentHashMap
ConcurrentHashSet
ConcurrentSkipListMap
ConcurrentSkipListSet
ConcurrentHashMap是专用于高并发的Map实现,内部实现进行了锁分离,get操作是无锁的。
java api也提供了一个实现ConcurrentSkipListMap接口的类,ConcurrentSkipListMap接口实现了与ConcurrentNavigableMap接口有相同行为的一个非阻塞式列表。从内部实现机制来讲,它使用了一个Skip List来存放数据。Skip List是基于并发列表的数据结构,效率与二叉树相近。
ConcurrentSkipListMap类提供的常用方法:
1
2
3
4
5
1. headMap(K toKey):K是在ConcurrentSkipListMap对象的 泛型参数里用到的键。这个方法返回映射中所有键值小于参数值toKey的子映射。2. tailMap(K fromKey):K是在ConcurrentSkipListMap对象的 泛型参数里用到的键。这个方法返回映射中所有键值大于参数值fromKey的子映射。3. putIfAbsent(K key,V value):如果映射中不存在键key,那么就将key和value保存到映射中。4. pollLastEntry():返回并移除映射中的最后一个Map.Entry对象。5. replace(K key,V value):如果映射中已经存在键key,则用参数中的value替换现有的值。