
03 Kubebuilder
1 概述
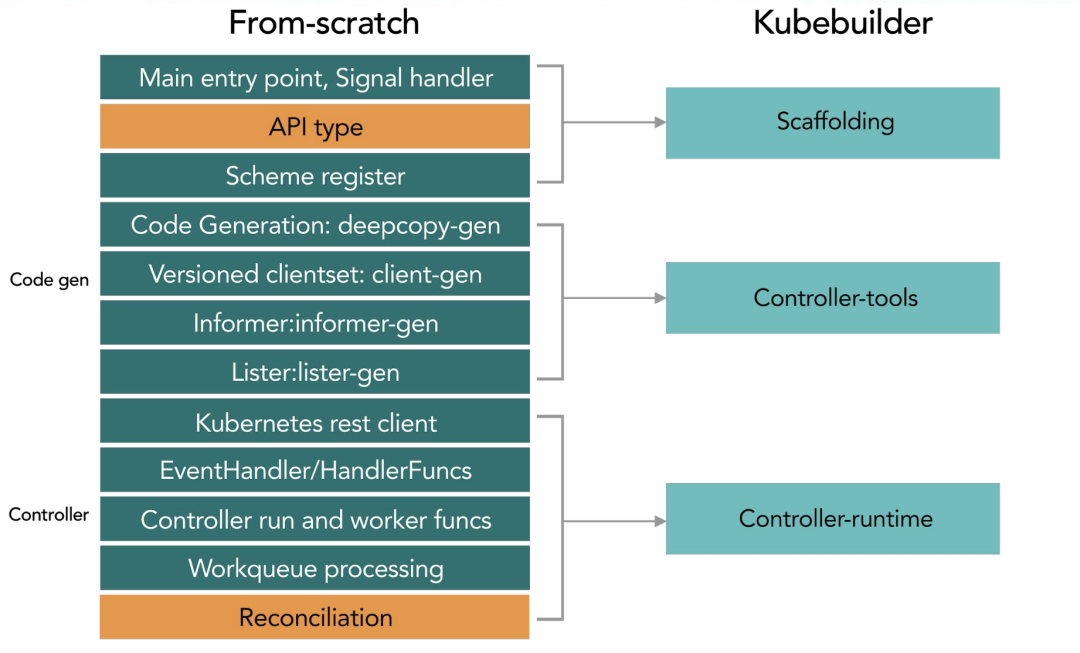
构建阶段
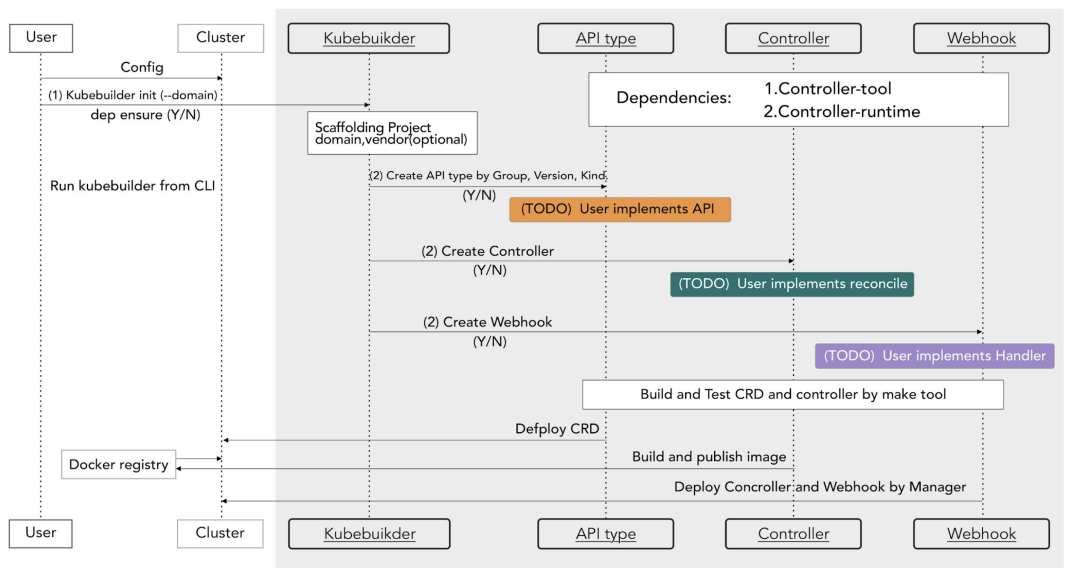
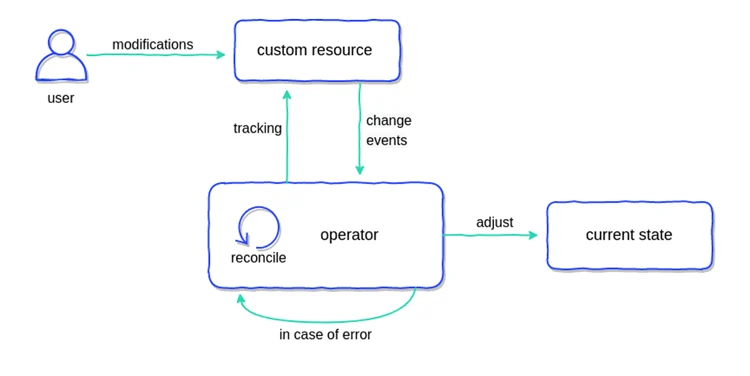
工作流程
2 使用流程
安装kubebuilder
1 | brew install kubebuilder |
创建工程
- 初始化一个项目目录
1 | mkdir -p $GOPATH/src/ykl.com/customer-controller/ |
- 定义crd所属的domain,生成一个工程.定义 crd 所属的 domain,这个指令会帮助你生成一个工程。
1 | kubebuilder init --domain estom.com --license apache2 --owner "Estom" |
创建后的目录结构如下:
- cmd目录下是启动脚本,编译后会在bin目录下生成manage可执行文件
- config目录下是基础工程配置。
1 | . |
- 创建 crd 在 golang 工程中的结构体,以及其所需的 controller 逻辑
1 | kubebuilder create api --group controller --version v1 --kind Application |
关键文件主要包括以下三个部分。创建后的目录结构如下:
- config/crd 用户自定义资源的定义。
- config/sample controller,Reconcile函数实现了处理逻辑。
- api/ crd和go模型的映射关系
1 | ├── Dockerfile |
自定义CRD&Controller
- 修改types.go文件,添加用户自定义字段,运行make可以生成新的crd
1 | /* |
- 修改contoller完善处理逻辑。controller对资源的监听依赖于Informer机制
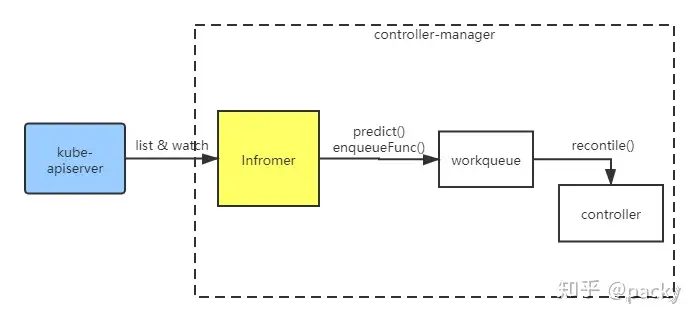
Informer 已经由kubebuilder和contorller-runtime 实现,监听到的资源的事件(创建、删除、更新、webhock)都会放在 Informer 中。然后这个事件会经过 predict()方法进行过滤,经过interface enqueue进行处理,最终放入 workqueue中。我们创建的 controller 则会依次从workqueue中拿取事件,并调用我们自己实现的 Recontile() 方法进行业务处理。控制器的处理函数,每当集群中有Sample资源的变动(CRUD),都会触发这个函数进行协调
1 | // +kubebuilder:rbac:groups=sample.sample.io,resources=samples,verbs=get;list;watch;create;update;patch;delete |
部署crd和controller
部署operator主要包括两个步骤,一个是安装crd、一个是注册controller处理程序。
- 在项目主目录下执行make install,会自动调用 kustomize 创建部署 crd 的yml。执行 make run 则在本地启动 controller 主程序。
1 | $ make run |
- 以deployment 方式部署controller时,可以使用 Dockerfile 构建镜像,使用config/manager/manager.yml 部署。
本博客所有文章除特别声明外,均采用 CC BY-NC-SA 4.0 许可协议。转载请注明来源 Estom的博客!
相关推荐

2021-09-02
03-日志记录
概述上篇文章分享了 Gin 框架的路由配置,这篇文章分享日志记录。 查了很多资料,Go 的日志记录用的最多的还是 github.com/sirupsen/logrus。 Logrus is a structured logger for Go (golang), completely API compatible with the standard library logger. Gin 框架的日志默认只会在控制台输出,咱们利用 Logrus 封装一个中间件,将日志记录到文件中。 这篇文章就是学习和使用 Logrus 。 日志格式比如,我们约定日志格式为 Text,包含字段如下: 请求时间、日志级别、状态码、执行时间、请求IP、请求方式、请求路由。 接下来,咱们利用 Logrus 实现它。 Logrus 使用用 dep 方式进行安装。 在 Gopkg.toml 文件新增: 123[[constraint]] name = "github.com/sirupsen/logrus" version = "1.4.2" 在项目中导入: ...

2021-03-22
41 单机模型并行
单机模型并行最佳实践 原文:https://pytorch.org/tutorials/intermediate/model_parallel_tutorial.html 作者:Shen Li 模型并行在分布式训练技术中被广泛使用。 先前的帖子已经解释了如何使用DataParallel在多个 GPU 上训练神经网络; 此功能将相同的模型复制到所有 GPU,其中每个 GPU 消耗输入数据的不同分区。 尽管它可以极大地加快训练过程,但不适用于模型太大而无法容纳单个 GPU 的某些用例。 这篇文章展示了如何通过使用模型并行解决该问题,与DataParallel相比,该模型将单个模型拆分到不同的 GPU 上,而不是在每个 GPU 上复制整个模型(具体来说, 假设模型m包含 10 层:使用DataParallel时,每个 GPU 都具有这 10 层中的每一个的副本,而当在两个 GPU 上并行使用模型时,每个 GPU 可以承载 5 层。 模型并行化的高级思想是将模型的不同子网放置在不同的设备上,并相应地实现forward方法以在设备之间移动中间输出。 由于模型的一部分仅在任何单个设备上运行...
2021-09-02
14 Redis使用场景
https://blog.csdn.net/zh15732621679/article/details/80614091 1 Redis使用场景计数器可以对 String 进行自增自减运算,从而实现计数器功能。 Redis 这种内存型数据库的读写性能非常高,很适合存储频繁读写的计数量。 缓存将热点数据放到内存中,设置内存的最大使用量以及淘汰策略来保证缓存的命中率。 查找表例如 DNS 记录就很适合使用 Redis 进行存储。 查找表和缓存类似,也是利用了 Redis 快速的查找特性。但是查找表的内容不能失效,而缓存的内容可以失效,因为缓存不作为可靠的数据来源。 消息队列List 是一个双向链表,可以通过 lpush 和 rpop 写入和读取消息 不过最好使用 Kafka、RabbitMQ等消息中间件。 会话缓存可以使用 Redis 来统一存储多台应用服务器的会话信息。 当应用服务器不再存储用户的会话信息,也就不再具有状态,一个用户可以请求任意一个应用服务器,从而更容易实现高可用性以及可伸缩性。 分布式锁实现在分布式场景下,无法使用单机环境下的锁来对多个节点上的进程进行同步。 ...
2020-10-11
11机器学习系统设计
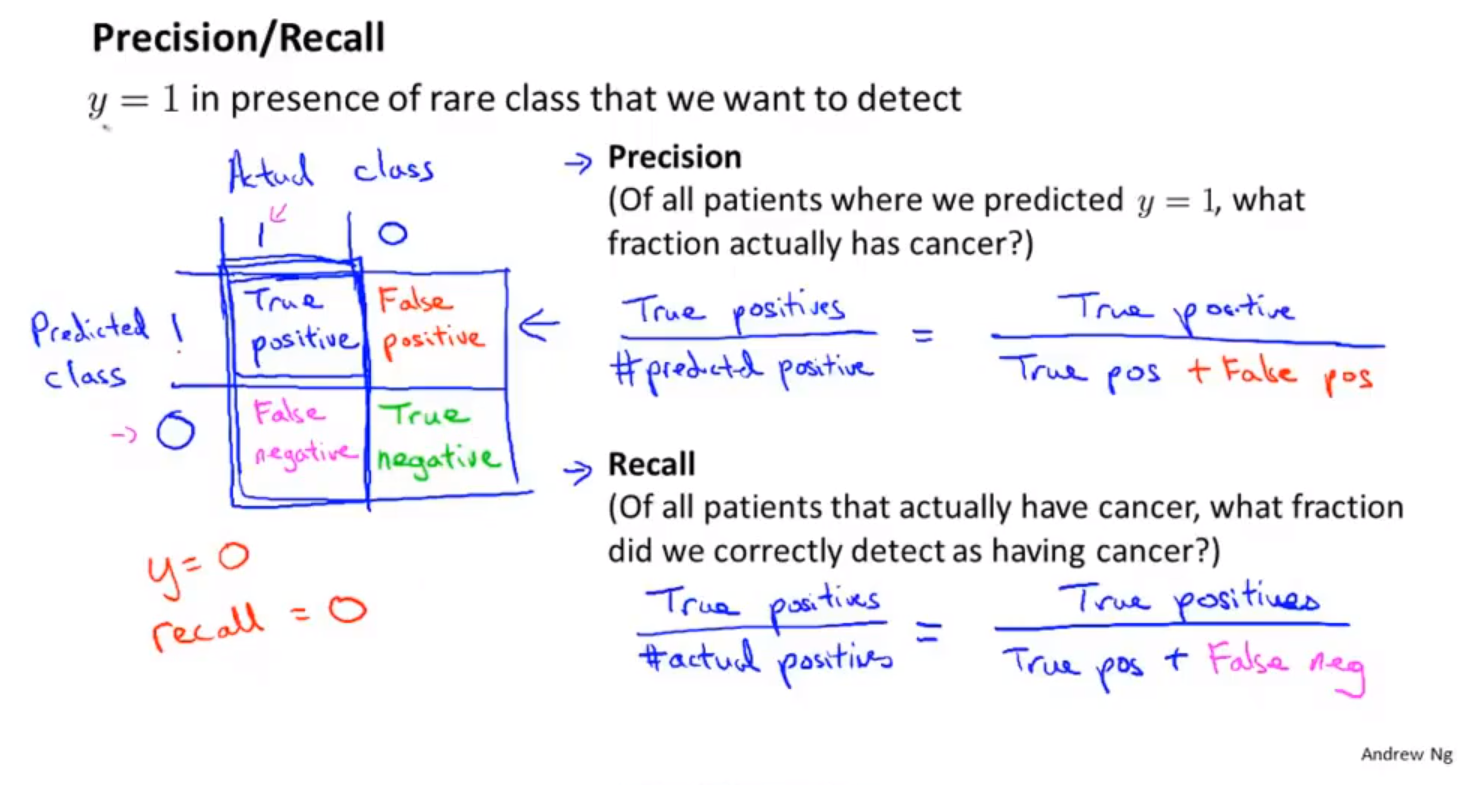
垃圾邮件分类系统误差分析机器学习实现的步骤 用最简单的算法快速实现机器学习过程。然后通过交叉验证数据集对模型进行测试。 画出学习曲线,通过检验误差,找出算法存在的高偏差、高方差问题。决定是否使用更多的数据和更多的特征。(不要过早的选择模型进行优化,应该首先对数据的特征进行分析。) 误差分析。通过分析错误数据,找到错误的原因,然后对机器学习算法进行改进。 数值估计。可以有效的改进机器学习算法。数值评估指标,来改进算法执行的效果。对数据进行特殊处理,例如只取邮件单词向量中单词前五个字母来训练数据。使用交叉验证错误率,来判断是否采取某项特殊处理。尝试各种不同的对算法的改进,然后使用交叉验证的方法,分析错误率的变化。 词干提取算法。 对算法的选择和改进 算法评估 误差分析 不对称分类的误差评估偏斜类 一个类别中的数据与另外一个类别中的数据量相差很大。 使用不同的方法,衡量偏斜类分类问题的准确率。 查准率和召回率 查准率:预测真实真值/预测真值。 召回率:预测真实真值/真实真值 在数理统计中使用第一类错误和第二类错误来描述查准率和召回率。只有增加样本的数量...
2023-08-15
01 简介
基本介绍简介Operator 是由 CoreOS 开发的,用来扩展 Kubernetes API,特定的应用程序控制器,它用来创建、配置和管理复杂的有状态应用,如数据库、缓存和监控系统。Operator 基于 Kubernetes 的资源和控制器概念之上构建,但同时又包含了应用程序特定的领域知识。创建Operator 的关键是CRD(自定义资源)的设计。 Operator 直接使用 Kubernetes API进行开发,也就是说他们可以根据这些控制器内部编写的自定义规则来监控集群、更改 Pods/Services、对正在运行的应用进行扩缩容。 Operator pattern首先由 CoreOS 提出,通过结合 CRD 和 custom controller 将特定应用的运维知识转换为代码,实现应用运维的自动化和智能化。Operator 允许 kubernetes 来管理复杂的,有状态的分布式应用程序,并由 kubernetes 对其进行自动化管理,例如,etcd operator 能够创建并管理一组 etcd 集群, 定制化的 controller 组件了解这些资源,...

2020-09-26
cursor_demo_sgskip
光标演示此示例显示如何使用matplotlib提供数据游标。 它使用matplotlib来绘制光标并且可能很慢,因为这需要在每次鼠标移动时重新绘制图形。 使用本机GUI绘图可以更快地进行镜像,就像在wxcursor_demo.py中一样。 mpldatacursor和mplcursors第三方包可用于实现类似的效果。参看这个: https://github.com/joferkington/mpldatacursor https://github.com/anntzer/mplcursors 12345678910111213141516171819202122232425262728293031323334353637383940414243444546474849505152535455565758596061626364656667686970import matplotlib.pyplot as pltimport numpy as npclass Cursor(object): def __init__(self, ax): self.ax = ax...


