
06 WebFlux03Server
1 WebFlux基于注解的编程的实现
创建WebFlux项目
- 创建Springboot项目,引入webflux的依赖
1 | pom.xml |
- 在配置文件中,设置启动端口号8081
1 | server.port =8081 |
- 从上到下设计代码:创建接口和实现类
1 |
|
- 从下到上实现代码:实现业务逻辑
1 |
|
实现说明
- SpringMVC范式,同步阻塞方式,基于SpringMVC+Servlet+Tomcat
- SpringWebflux方式,异步非阻塞方式,基于SpringMVCWebflux+Reactor+Netty
2 WebFlux基于函数的编程的实现
简要说明
bio,nio,aio
在使用函数式编程,需要自己初始化服务器
基于函数式编程模型的时候,有两个核心接口。
- RouterFunction 实现路由功能,请求转发给对应的handler
- HandlerFunction 处理请求生成响应函数。
核心任务定义两个函数式接口的实现,并启动需要的服务器。
SpringWebFlux的请求和响应是
- ServerRequest
- ServerResponse
实现流程
- 从上到下实现业务bean
- 创建handler实现Mono方法
1 |
|
- 创建并初始化服务器,设置路由和handler
1 | public class Server { |
3 WebClient调用
1 | public class Client { |
本博客所有文章除特别声明外,均采用 CC BY-NC-SA 4.0 许可协议。转载请注明来源 Estom的博客!
相关推荐
2022-11-01
1 概述
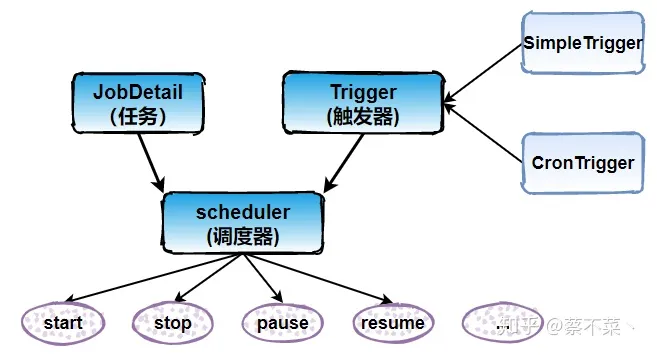
概述 一篇就够了: https://zhuanlan.zhihu.com/p/306591082 1 概述什么是QuartzQuartz是一个完全由Java编写的开源作业调度框架,为在Java应用程序中进行作业调度提供了简单却强大的机制。Quartz允许开发人员根据时间间隔来调度作业。它实现了作业和触发器的多对多的关系,还能把多个作业与不同的触发器关联。简单地创建一个org.quarz.Job接口的Java类,Job接口包含唯一的方法: 1public void execute(JobExecutionContext context) throws JobExecutionException; 在Job接口实现类里面,添加需要的逻辑到execute()方法中。配置好Job实现类并设定好调度时间表,Quartz就会自动在设定的时间调度作业执行execute()。 整合了Quartz的应用程序可以重用不同事件的作业,还可以为一个事件组合多个作业。Quartz通过属性文件来配置JDBC事务的数据源、全局作业、触发器侦听器、插件、线程池等等。 核心概念 Job 表示一个工作,要执行的具...

2020-07-08
07 数据访问-1jdbc
1 jdbc配置 数据库与数据源不是同一个东西。。。三层关键概念需要理解 数据库驱动mysql、hsqldb 数据源datasource和数据库连接池Harica、Druid 数据库操作工具JDBCTemplates、Mybatis 数据源配置pom.xml 1234<dependency> <groupId>org.springframework.boot</groupId> <artifactId>spring-boot-starter-jdbc</artifactId></dependency> 嵌入式数据库驱动嵌入式数据库支持:H2、HSQL、Derby。不需要任何配置,被集成到springboot的jar包当中。 12345<dependency> <groupId>org.hsqldb</groupId> <artifactId>hsqldb</artifactId> <scope>run...
2020-01-05
4.2 大整数乘法问题
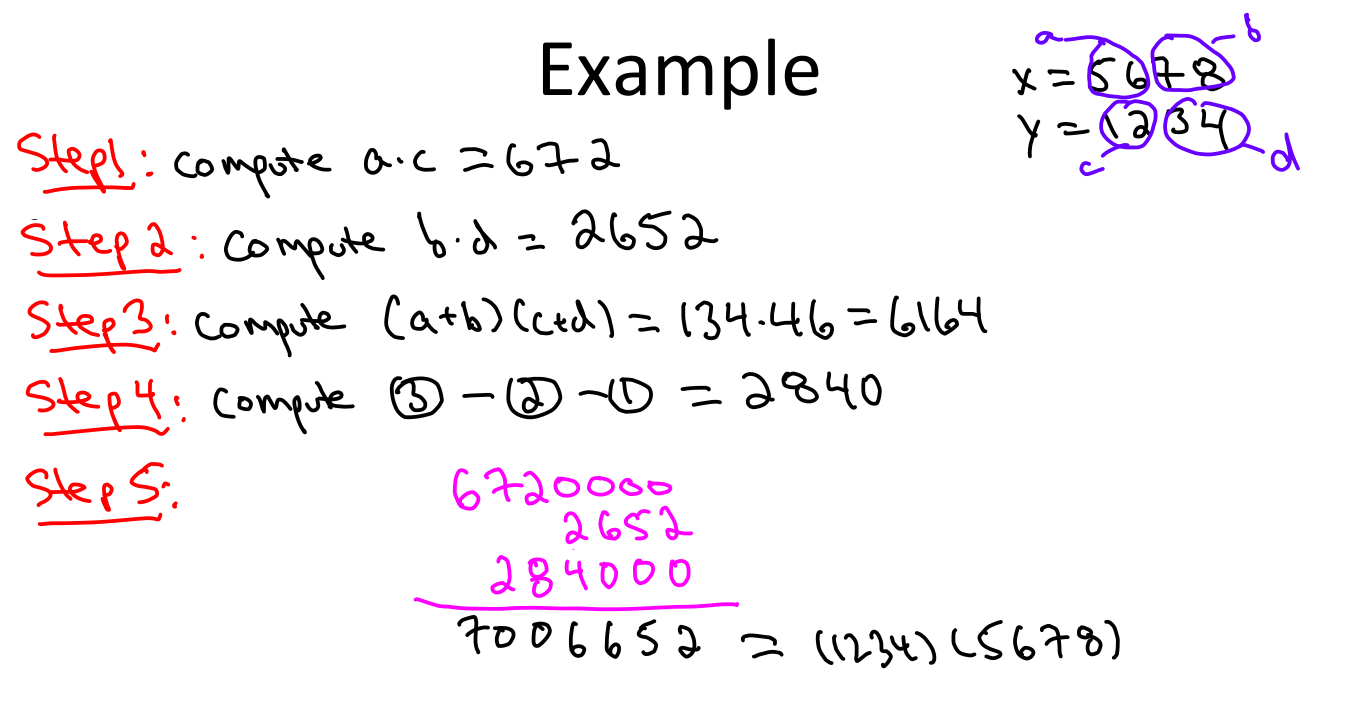
大整数乘法 参考文献 大数乘法的问题及其高效的算法 问题描述 题目描述: 输出两个不超过100位的大整数的乘积。 输入: 输入两个大整数,如1234567 和 123 输出: 输出乘积,如:151851741 数字以字符串的形式给出。 1求 1234567891011121314151617181920 * 2019181716151413121110987654321 的乘积结果 问题分析 所谓大数相乘(Multiplication algorithm),就是指数字比较大,相乘的结果超出了基本类型的表示范围,所以这样的数不能够直接做乘法运算。参考了很多资料,包括维基百科词条Multiplication algorithm,才知道目前大数乘法算法主要有以下几种思路: 模拟小学乘法:最简单的乘法竖式手算的累加型; 分治乘法:最简单的是Karatsuba乘法,一般化以后有Toom-Cook乘法; 快速傅里叶变换FFT:(为了避免精度问题,可以改用快速数论变换FNTT),时间复杂度O(N lgN lglgN)。具体可参照Schönhage–Strassen algorith...

2022-11-09
注解编程01-spring
注解总结 注解位置 类注解@Component、@Repository、@Controller、@Service以及JavaEE6的@ManagedBean和@Named注解 方法注解 @Bean、@Autowire、@Value、@Resource以及EJB和WebService相关的注解等 属性注解 必须被扫描到的类启动类@SpringBootApplication--@ComponentScan–>扫描类@Component->扫描方法@Bean 1 配置类相关注解 启动Spring扫描的基础类。 @SpringBootApplication@SpringBootApplication申明让spring boot自动给程序进行必要的配置,这个配置等同于:@Configuration ,@EnableAutoConfiguration 和 @ComponentScan 三个配置。 使用了此注解的类首先会让Spring Boot启动对base package以及其sub-pacakage下的类进行component scan。 @ComponentScan@...
2021-04-08
2.2 简单工厂
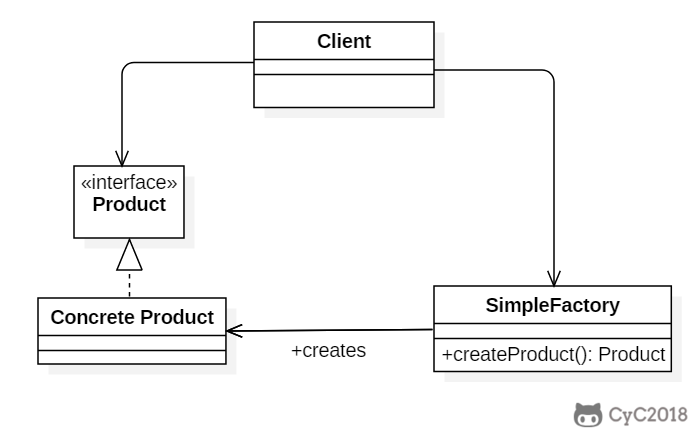
简单工厂(Simple Factory)Intent在创建一个对象时不向客户暴露内部细节,并提供一个创建对象的通用接口。 Class Diagram简单工厂把实例化的操作单独放到一个类中,这个类就成为简单工厂类,让简单工厂类来决定应该用哪个具体子类来实例化。 这样做能把客户类和具体子类的实现解耦,客户类不再需要知道有哪些子类以及应当实例化哪个子类。客户类往往有多个,如果不使用简单工厂,那么所有的客户类都要知道所有子类的细节。而且一旦子类发生改变,例如增加子类,那么所有的客户类都要进行修改。 Implementation12public interface Product {} 12public class ConcreteProduct implements Product {} 12public class ConcreteProduct1 implements Product {} 12public class ConcreteProduct2 implements Product {} ...

2021-12-24
bg
bg将前台终端作业移动到后台运行 概要1bg [job_spec ...] 主要用途 用于将作业放到后台运行,使前台可以执行其他任务。该命令的运行效果与在指令后面添加符号&的效果是相同的,都是将其放到系统后台执行。 若后台任务中只有一个,则使用该命令时可以省略任务号。 参数job_spec(可选):指定要移动到后台执行的作业标识符,可以是一到多个。 返回值返回成功除非未开启作业控制或发生了错误。 例子12345678910# 运行sleep命令,然后按下ctrl+z。sleep 60^Z[1]+ Stopped sleep 60# 使用bg命令使得作业在后台运行。bg %1# 返回信息:[1]+ sleep 60 & 注意 bash的作业控制命令包括bg fg kill wait disown suspend。 该命令需要set选项monitor处于开启状态时才能执行;查看作业控制状态:输入set -o查看monitor行;执行set -o monitor或set -m开启该选项。 该命令是bash内建命令,相关的帮助信...


